Edit the block types of many schematic files at once
Details
Batch Schem Edit
View and download directly on github
With this python program, you can load many .schem files at once, replace block types in all of them and save the changes back to schem.
select which blocks to replace. empty replacements will be ignored
copy paste with ctrl+c ctrl+v
save and load settings to/from file to be able to reuse the exact replacements
run “replace blocks” to edit loaded schematics
save to original or as a copy
Additional:
The list of suggested blocks is updated from the loaded schematics when using “replace” and saved to minecraft_blocks.txt.
Restart program to get updated suggestions.
Supported schematics
sponge v2 (default worldedit)
Run from source
Requirements
python installed on system
python dependecy manager like pip
Schematic Preview will bulk-generate preview images for every .schem file in a folder , including subfolders with a single click.
All images are saved to the scripts directory inside the search folders name. Use it to quickly get a visual overview over a schematics pack.
Run the app:
LootPainter is a lightweight Python tool designed to create, modify, and inject loot tables into target container blocks within Minecraft schematic files (.schem, .schematic, .nbt), primarily for use in WorldPainter. It allows users to create their own custom loot tables and inject those loot tables into schematics, as well as creates an appropriate datapack for the map folder.
Features
1. Loot Table Generator
Visual Interface: Create and modify simple loot pools without writing JSON.
Preset System: Includes preset tables for generic Dungeons, Shipwrecks, Villages, and more.
Items: Contains an incomplete list of common loot items, but you can type in any item ID manually.
NBT Editor: Add enchantments, names, colors, and potion effects to items.
Export: Generates a ready-to-use datapack folder structure.
2. Schematic Injector
Batch Processing: Select a folder of .schematic.schem or .nbt files.
Injection: Replaces the target container’s contents with your custom LootTable path string (e.g., custom:chests/dungeon_tier_1).
Installation & Use
For Users
Download the latest executable from the Releases tab. No Python installation required.
Loot tables
Select a preset or import an existing .json loot table.
From there you can type in an item ID or select one from the drop-down.
“W” is your weight or probability, while “Min” and “Max” refer to minimum and maximum stack size.
To edit an item’s nbt data, you can select it from the list, click “edit nbt”, and from there add what tags you like.
“Simulate Chest” opens a new window that simulates a chest so you can get a good idea for how the weight and stacks work.
Click “generate datapack” and keep this datapack to be placed in your map folder after exporting in WorldPainter. The “Filename” here will be needed in the “Injector” tab under “Loot Table String”
Injector
Select the folder of schematics you’d like to inject
Create an output folder and select it, this will place new edited copies of your schematics and keep the originals untouched for backups
Target containers require the loot table string, which is “custom.[container]/[filename]”
The loot table string points to the datapack created on the first tab
Known Issues & Warnings
Loot Table Generator
Duplicate IDs: The generator currently does not prevent you from adding the same item ID twice. If you do, the last one entered will overwrite the previous ones in the final JSON.
Generate Chest: Sometimes item icons don’t get displayed, and show as a yellow “!”. Hovering over the items shows its details however.
Import .json: Currently this is a “lossy” import as LootPainter doesn’t mess with certain nbt tags that might appear in other loot tables. If you import a complex loot table containing conditions, predicates, or advanced functions, those extra features will be stripped out upon import.
Schematic Injector
Supported Containers: Currently supports Chests, Barrels, Shulkers, Dispensers, Droppers, and Hoppers. Modded containers are not supported.
Coordinator (Experimental)
The “Coordinator” tab is currently disabled in this beta build as it undergoes a rewrite.
This is a WorldPainter plugin designed to add slab and stair detail to terrain and increase
the effective resolution of the terrain. Current version: 1.0.1 (Snapshot 2)
Possibilities
Currently, the following is supported:
Automatic stair and slab placement on terrain
Support for Conquest Reforged shapes such as vertical slabs
Bicubic and bilinear interpolation to upscale the internal heightmap
Samples
Installation and usage
Place the SlabifyPlugin-X.X.X.jar into the WorldPainterplugins folder. On Windows, this would be
%AppData%/Roaming/WorldPainter/plugins. Alternatively, you can click on “Open plugins folder” in the
WorldPainter toolbar.
Creating a slab layer is done in a similar manner to a custom object layer.
Number
Name
Description
1
Name
The name of the layer.
2
Paint
The color of the layer.
3
Material
The material of the slab. This is not used if Option 5 is selected. The blocks must be full blocks. For example, minecraft:stone is correct, but minecraft:stone_slab will result in an error.
4
Replace non-solid blocks
Select this option to ensure slabs and other shapes will replace non-solid blocks like grass.
5
Mimic underlying blocks
Select this option to enable Options 10 to 15.
6
Height increase
The amount to increase the height by. Allowable values range from 0 to 1.5. Setting this value to 0 will result in both the removal and addition of blocks to the terrain. Setting this value to 0.5 will result in (typically) only the addition of blocks to the terrain. For reference, the WorldPainter frost layer increases the terrain height by 0.5.
7
Use Conquest blocks
Select this option to allow blocks from the conquest namespace. This option must be selected to enable the additional Conquest shapes.
8
Allowed shapes
Click this button to open a dialog to select the shapes to use (e.g., stairs and slabs).
9
Interpolation method
The interpolation method to use to inform slab and shape placement. Bilinear is faster and bicubic is slower. However, bicubic interpolation results in sharper images and may result in better-looking terrain in certain applications.
10
“Mimic” table
This table will only be active if Option 5 is selected. This allows the placement of a certain slab material on top of a terrain material. For instance, if the underlying block is minecraft:stone and the slab block is minecraft:diorite, diorite slabs and stairs will be placed on top stone blocks whereever needed. Like Option 3, the slab block must be a full block. minecraft:diorite is correct, but minecraft:diorite_slab is not!
11
Add table entry
Add an extra row to the table.
12
Remove table entry
Remove the last row of the table.
13
Load configuration
Load a previous table configuration from file.
14
Save configuration
Save the current table configuration to file.
15
Visualizer
Visualize how the slabs/stairs would look on the underlying block.
All the shapes should be self-explanatory. Note that in Vanilla Minecraft, the shape is only available for
minecraft:snow_block (as snow layers). No issues will arise if a shape that is not available is selected.
Advanced: After running the plugin at least once, there should be a file %AppData%/Roaming/WorldPainter/mapping.csv.
This file links together blocks and their slab and stair (and Conquest shape) variants. The first column represents
the block to be entered and the remaining columns represent the variants connected to that block. If you
are unsure which block to enter to get a certain slab material, this file is your guide. While you can also
add your own rows to this file, it is comprehensive for both Vanilla Minecraft and Conquest Reforged.
Note
This plugin is still under development. If a bug occurs, please contact me through Discord or create an issue.
Files with layers created by older versions will be backwards compatible with newer versions unless noted
otherwise. As my time is limited, contributions are highly welcome!
Distributing
Slabify is open source software, licensed under the GPL version 3. This means that if you distribute it, original or in modified form, you must also distribute it (including your changes) as open source under the GPL version 3 (or later). See the LICENSE file for details.
The MacroMachine Plugin automates global operation workflows.
Define simple actions, like applying terrain to certain slopes, and combine many actions into a Macro, that is executed with a single click across the whole map.
Actions and Macros are saved into the plugins folder and available in all worldpainter projects.
100 seconds overview on Youtube
Tutorials
This youtube playlist contains tutorial videos that cover the most important steps.
Find the Macro tool and left click it. The macro panel will open.
Select the macro you want to execute by left clicking it in the tree view.
Press “Apply Macros” on the bottom, the macro will execute globally on the whole map.
Click into worldpainter or close the Macro Panel.
Deselect macro tool, reselect macro tool to open the panel again.
Edit Macros
Youtube Tutorial
Let’s create a simple macro that creates a mask for us: add all Swamp and Desert biome to selection.
Create a new macro by clicking “Create Macro”. A new macro with the name “New mapping macro” appears in the tree panel.
Left click “New Mapping Macro”. It is now shown in the macro designer on the right.
The macro is a list of actions that are run in fixed order. Topmost action goes first, bottom most action goes last. Right now the list is still empty.
Click “Add”, then select “create new action” in the dialog. A new action is created and added to the list. Press “save” to save the changes we made to this macro.
In the tree view (left), expand the Macro. You can see that is now has an action listed. Select the action
The Action Designer now opens on the right. Select “biome” as input, “set” as type, “selection block” as output.
In the table on the right, set “swamp” and “desert” to “Selection Block: ON”. This means when the action is executed, all blocks that are “swamp” or “desert” biome are set to be selected. All blocks that are a different biome are deselected.
Save your progressof this action with the “save” key
Select the macro where the action lives in.
Press “execute macro”
All swamp and desert biome blocks are now selected, everything else is deselected
check the “log” tab, to see some statistics about your action.
Gradient Editor
Not all actions are simple “if this, then this”, like our desert-and-swamp-to-selection example.
If you want to paint pine trees in flat slopes and reduce the amount the steeper it gets, a 1:1 mapping for each angle is very tedious.
For this, the gradient editor exists.
Create an action with input: slope, type: set, output: pines
The x axis (bottom) is the input values
The y axis (left) is the output value
The curve shows you which input is mapped to which output value
Left click into the curve to add a new point
Drag points to change where you want them
Right click to delete a point
Values between points are automatically interpolated
the curve below means that pines are set with strength=10 when the slope is 0°. the steeper the area, the lower pine strength gets, up until 60° slope with strength=7. Then it falls to strength=0 at slope=70°.
You can edit values in the table, but only where points are set. Editable values are black, Interpolated values are grey.
Run the action on a world with a mountain
Sometimes the input can be interpolated, but the output is fixed values, like mapping slope to annotation colors. If that happens, the gradient editor is available and you can define input ranges to map to specific values:
Filter
If you only want to operate on some parts of the map, you should use the action filter. Create an action that uses an input to set the action filter.
Any actions in the macro after the filter action will ignore blocks that were previously filtered out.
Use Always-set-ActionFilter to reset the filter and allow all blocks.
Each filter is limited to its macro and does not influence other macros.
More restrictive filters usually also mean better performance, because less tiles have to be touched by the macro.
Always input
Use the “Always” input to apply an output everywhere. Always still respects previous Action-Filters and will ignore filtered out blocks.
Spraypaint
Spraypaint output will spraypaint a layer onto blocks with certain chance for each block.
Intermediate value
This input/output only exists during the execution of the macro. it allows you to save values for the duration fo the execution.
The alpine macro uses it to store the chance for snow in each block over multple actions, before finally applying it to snow.
Its also more performance-friendly than saving the value into a layer in the world.
Nesting macros
You can call a macro inside of another macro. But beware: if macro A calls Macro B and macro B calls Macro A, you get an infinite loop. The system will detect it and now allow you to save such a state.
Custom layers
It’s not yet possible to use custom layers as inputs or outputs. We are working on it.
troubleshooting
Q: What does this panel do
A: Look for the “?” button and hover over buttons to see tooltips.
Q: If i click “Apply macros”, nothing on my map happens
A: check the log. usually, the macro does something under special circumstances that dont exist on your map, f.e. because the map is flat and the macro tries to paint mountains in steep areas.
Q: Something broke, what now?
A: Send a bug report to @IR0NSIGHT in the discord https://discord.gg/9kRJEMfGeE or on github here. You can find your log files in the parent folder of top bar -> tools -> open plugins folder. The logs are calles logfile0.txt usually, please include the latest log file.
The “Select Edge Operation” can be found in the tools section of worldpainter. Select the 2 blue circles.
Specify your wanted settings in the tool-settings section. You will probably need to adjust your layout to see all of the settings tab.
Press “run” in the settings tab to execute the plugin
The plugin will find all blocks that are the input layer, grow in the specified direction, apply the gradient and the paint the result as the output layer in the map
Gradient Editor
If you press gradient: edit, a graphical editor for the applied gradient will appear.
It shows a preview of the output, where left is the beginning of your input layer and the gradient grows to the right.
The gradient is not to scale and will be rescaled by the operation using the selected “width” parameter.
troubleshooting
Q: I dont see the “run” or “help” button
A: Your tool settings window is to small. Drag it wider
Q: If i click run, nothing on my map happens
A: You need to have blocks of your selected input layer painted on the map, otherwise nothing can and will happen.
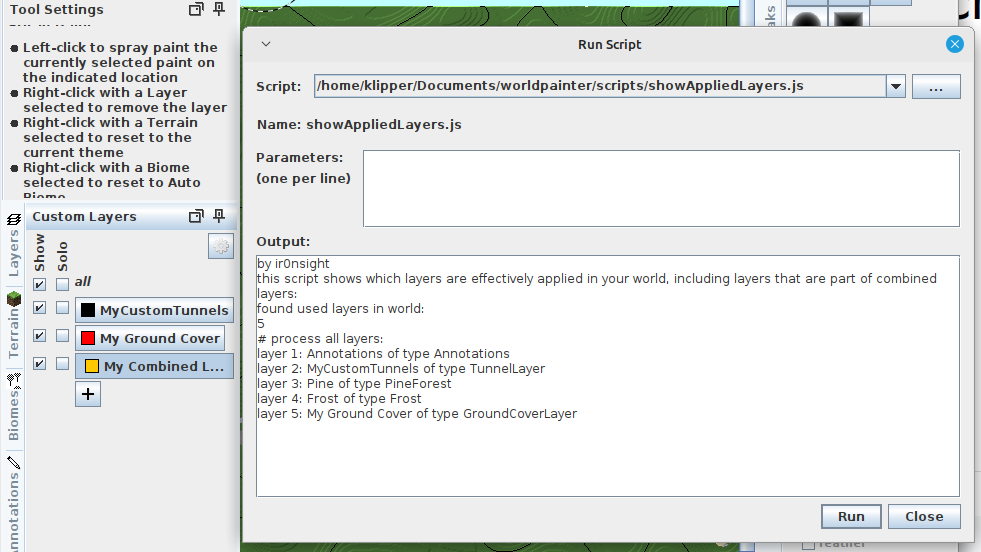
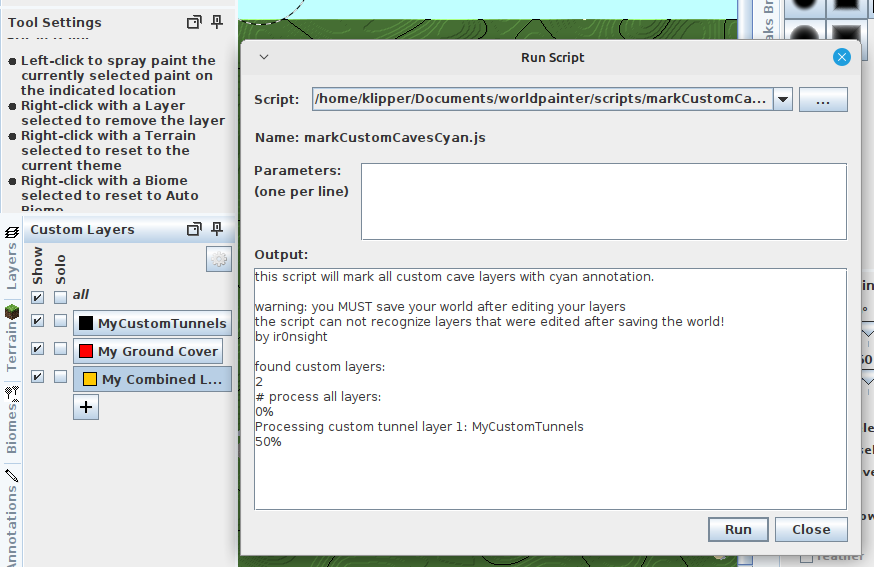
In this tutorial, we will create a first script and learn the very basics of javascript in worldpainter
Details
This tutorial is for people who know nothing about scripting/programming. I will explain the very basics starting from zero and in the end you will be able to create small scripts for worldpainter by yourself, you will know all the relevant tools and where to find help if something doesn’t work.
To start out you only need worldpainter installed and a text editor, windows comes preinstalled with Notepad (dont use word).
Creating a first script file
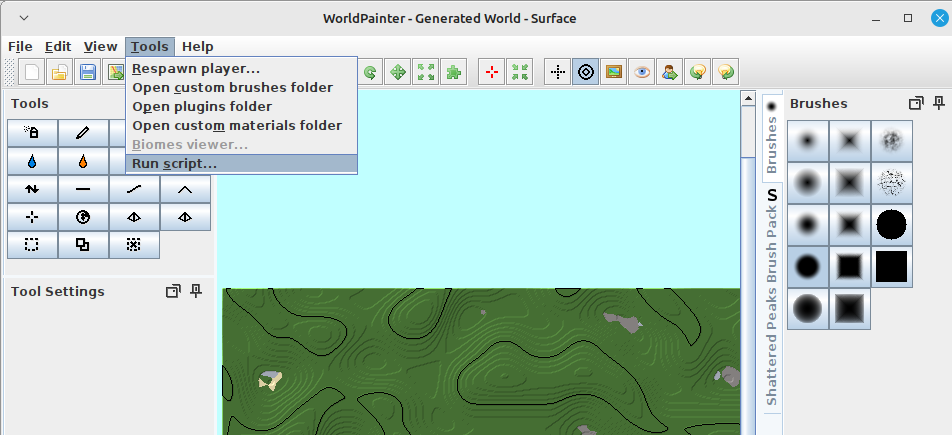
Worldpainter has the ability to run scripts by executing javascript files:
Such a script file is essentially a text file with a .js ending that contains code. When executed, worldpainter loads that file, reads it from the top to the bottom, line by line and then executes it. This holds true for most programming languages, its always top to bottom, left to right, statement by statement. For javascript and worldpainter, it doesn’t matter where the file is saved, only the contents of the file (the “text”) matters.
Fun fact: file extensions dont really mean anything. Sometimes programs expect them to be a specific ending, but you can rename a .js file to .txt and open it with word. (Word is not a code editor, please dont use it for that). This holds true for programming files, but not necessarily for other stuff. docX word files are actually zip folders, etc.
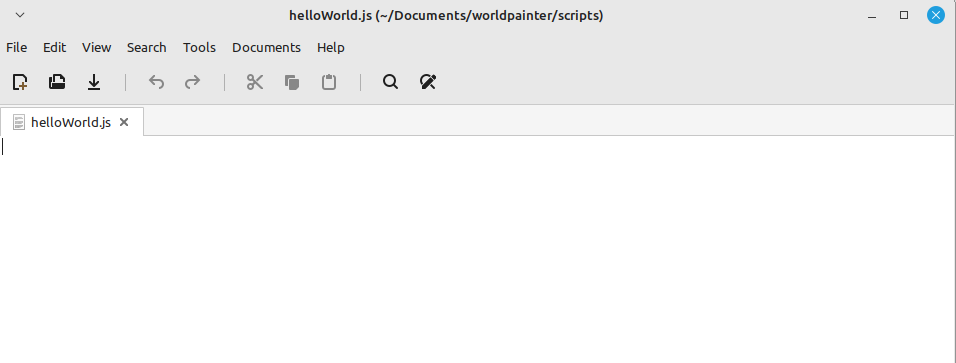
We can open and edit these files or create them by ourselves. For starters, open your text editor (or notepad, NOT WORD!) and create a new file called helloWorld.js in a folder where you can find it again. It might make sense to create a mydocuments/worldpainter/scripts folder, to stay organized:
And thats it, you can load and execute this script file now in worldpainter. Hurray! Of course it doesn’t do anything yet, so lets change that. So, we know that code is read top to bottom, left to right. Now how do we make it do something?
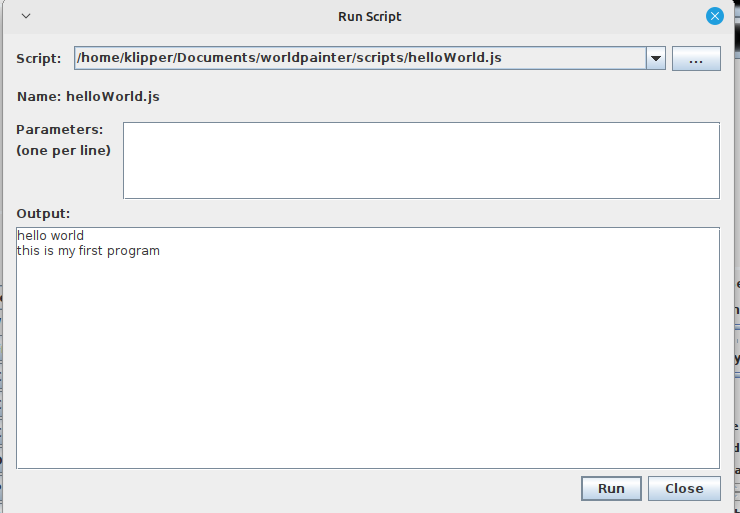
print("hello world");
print("this is my first program");
add that to your file and execute it in worldpainter.
So we see in the output that the first line was executed first, and the second after that. Notice the “;” at the end of the lines. In javascript, this is what ends a statement. A statement is a single instruction that tells the computer to do something. The computer reads (“parses”) the script file from top to bottom, left to right, but in the end its the ; that defines where a statement starts and ends. We could rewrite our code like this and achieve the same output:
print("hello world");
print("this is my first program");
For readability, programmers have come to write ONE statement per line. Its purely a formatting thing, but its a standard that will make your life easier in the long run. So back to this we go:
print("hello world");
print("this is my first program");
To make understanding code easier, programmers use comments in their script files. Every line that starts with // is consideres a comment in javascript and will be ignored by the computer when reading the file:
// i am a comment
// this line is ignored: print("i am ignored")
print("hello world"); //comments can go anywhere
print("this is my first program");
Variables
So far we haven’t done anything useful. Lets do some maths, that basic building block of all programming. First we declare a variable and then do something with it:
//define the variable
var myVariable = 5;

//print it
print(myVariable);

// assign it a new value
myVariable = 10;
print(myVariable);

//do maths
myVariable = (150 + 270 + 999 - 42 + 4) * 30,462708182;
print(myVariable);
The pattern is always the same: first you define the variable, you tell the computer that it exists: var myName = 12345; after that, you can assign new values to it. Every variable that you used MUST first be defined before you can do anything with it, similar to a function. Its always the same: first define, then assign, then use.
Functions and code blocks
Now what is that print( ) thing we did? Its called a function. A function is a block of code that is defined somewhere (in this case worldpainter defines it without us seeing it in our own code). We can call functions like this to execute the code inside them and give them parameters. 1. print is the function 2. “hello world” is the parameter 3. print(“hello world”) is the function-call. a function itself doesnt do anything on its own, unless it is called. Lets see this in action. First we define a function, we call it doSomething
function doSomething() {
   print("hello world");
   print("this is my first program");
};
The function definition usually goes on top of the file, so the computer reads it first before it is being used/being called. Now that we have our function defined, we can call it:
function doSomething() {
   print("hello world");
   print("this is my first program");
};

doSomething();
the { and } brackets define the start and end of a code block. print is a function too, just like doSomething. The difference is that it is defined by worldpainter, outside of our code and we can use it without having to define it ourselves.
The main purpose of functions is two things: – make code easily reusable – make code more readable by grouping code that does one thing into a properly names function.
Usually, when the computer has finished executing a script, it will “forget” everything that was defined inside the script file. This is NOT the case in worldpainter, as long as worldpainter runs, it will remember function that you defined in scripts.
Lets create a script that calculate the yearly wage of 3 people:
// money danny makes per hour
var dannyWageHour = 7;
var elmoWageHour = 15;
var dieterWageHour = 3.5;

// function takes hourly wage as input and returns the yearly wage
function hourToYearlyWage(hourWage) {
   var workHoursPerWeek = 40;
   var weeksPerMonthAverage = 4.25;
   var monthsPerYear = 12;
   var yearWage = hourWage * workHoursPerWeek * weeksPerMonthAverage * monthsPerYear;
   return yearWage;
};

print("danny:");
print(hourToYearlyWage(dannyWageHour));

print("elmo");
print(hourToYearlyWage(elmoWageHour));

print("dieter");
print(hourToYearlyWage(dieterWageHour));
So our function allowed us to do repetitive tasks easily with very few lines of code. That is the essence of scripting. On top of that, if we want to change the maths, we can do it inside the function and it will apply to all 3 employees. For example when we have reduced working hours to 35 a week, we only have to edit it once.
Fun fact: You can define functions inside of functions inside of functions etc. They will only exist in the block where they were defined, that is called “scoping”.
Objects
The last important building block you need to know about in javascript, are objects. Just like you can group together code (logic) into a function, you can do so with values / variables:
//define the object
var dannyEmployee = {
   name: "Danny",
   wageHour: 7,
   pet: "dog"
};

//get a value:
print(dannyEmployee.name);
print(dannyEmployee.wageHour);
print(dannyEmployee.pet);

//assign a value, danny got promoted
dannyEmployee.wageHour = dannyEmployee.wageHour + 5

print(dannyEmployee.name);
print(dannyEmployee.wageHour);
print(dannyEmployee.pet);

//print the whole object at once
print(Json.stringify(dannyEmployee));
In javascript, objects are defined with key-value pairs: name is the key “danny” is the value of the key
key-value pairs are encapsulted with { } brackets and separated with , This is called Javascript-object-notation (JSON) and a standard which you can google.
Interacting with the worldpainter world
So now that we have the basics covered, we can start interacting with worldpainter. But how? Worldpainter prepares a way for our script to give it commands and interact with the world: https://www.worldpainter.net/trac/wiki/Scripting/API
Worldpainter has pre defined a couple of objects and functions for us to easily achieve large scale editing tasks.
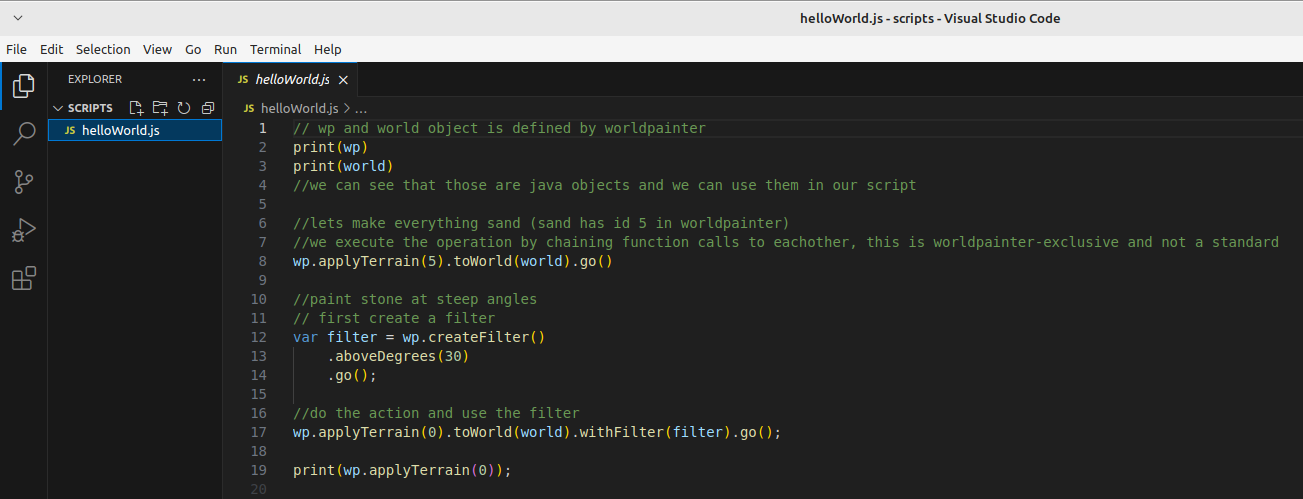
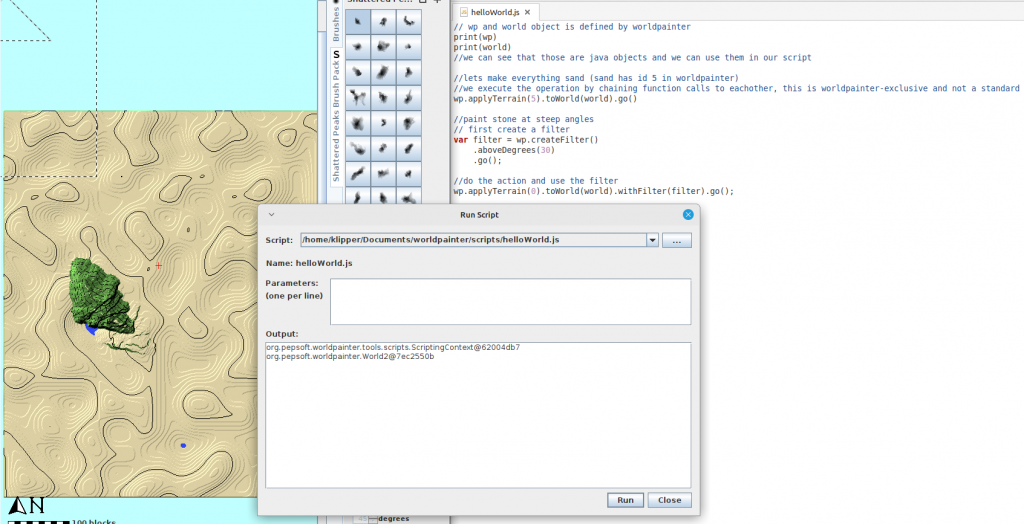
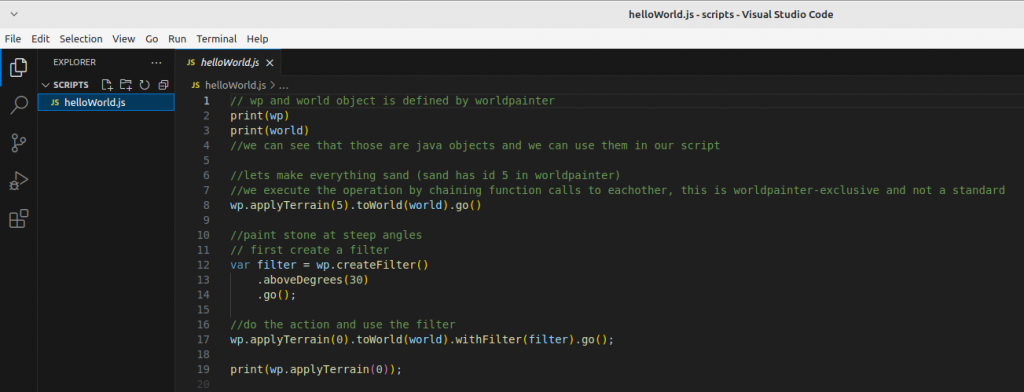
// wp and world object is defined by worldpainter
print(wp)
print(world)
//we can see that those are java objects and we can use them in our script

//lets make everything sand (sand has id 5 in worldpainter)
//we execute the operation by chaining function calls to eachother, this is worldpainter-exclusive and not a standard
wp.applyTerrain(5).toWorld(world).go()

//paint stone at steep angles
// first create a filter
var filter = wp.createFilter()
    .aboveDegrees(30)
    .go();

//do the action and use the filter
wp.applyTerrain(0).toWorld(world).withFilter(filter).go();
Please note that the chaining of function calls is a worldpainter specific thing. wp.applyTerrain(0) returns an object of type “MappingOperation”, which we then call mappingOperation.toWorld(world), which again returns a mappingOperation obejct. In theory we could express the same like this:
var op1 = wp.applyTerrain(0); //mapping operation with grass
var op2 = op1.toWorld(world);
var op2 = op2.withFilter(filter);
op2.go();
This code is correct BUT worldpainter will throw an error at us. It wants us to do the chaining and execution with “go()” in one step, and will not allow it do be done in multiple steps.
Running javascript outside of worldpainter
So far we know that we can write code, give it worldpainter and it will execute it. But whats actually going on? All code in the beginning is just text, as we already discovered. This text is then given to a program thats able to execute code, the Runtime. In our case, worldpainter has a built-in javascript runtime, a java-library called Nashorn. Nashorn is a javascript runtime, that can read and execute an older version of javascript (ecma 5.1) AND allows the mixing of java and javascript. This is relevant, because worldpainter is writte in Java, a different language that has no connection to javascript (besides the name), and different programming languages can not interact with eachother by default.
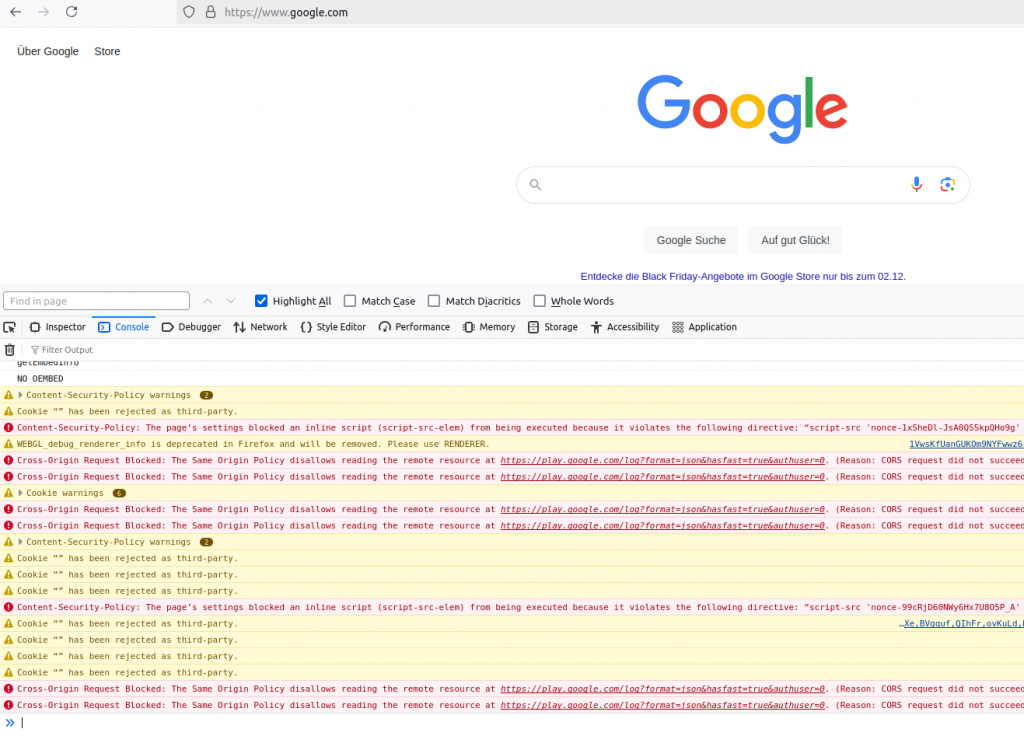
Now, we have written normal javascript files so far, but they are not exclusive to worldpainter. We can run them in other javascript runtimes too. It just so happens, that all webbrowsers have such a JS-runtime, so we can execute javascript code in our browser. For that we open a browser (in my case firefox), press F12 and go to console:
in the bottom window, we have a text input, this is where we can type in javascript, press enter and have it executed:
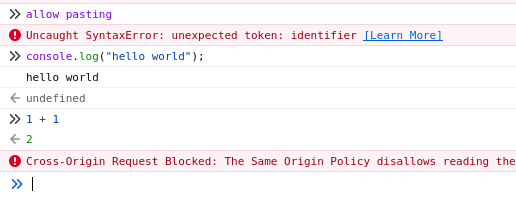
in my case, i had to type “allow pasting” first to paste my clipboard there, because firefox thought i was getting scammed and told to paste stuff i dont understand. Notice how i used “console.log” instead of “print”? That is because the browser is not worldpainter, print() has a different meaning here (it prints the page). Instead the node.js – runtime in our browser defines the console object which allows us to interact with the console window:
// print("hello world") becomes this in the browser:
console.log("hello world");
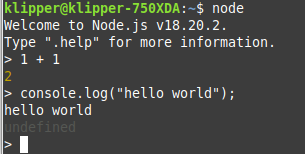
You can also download and install node.js onto your computer and use it over the command line:
Just a neat little thing to know that code can be executed outside of worldpainter too. Of course you can not use things that are only defined in worldpaiinter such as wp, world or print.
Professional editing tools
So far we have written our scripts in Windows Text Editor “Notepad” (well you have, im on linux). Maybe you have already made a typo on accident and caused the program to throw an error, or misbehave in other ways. And maybe finding the typo was very annoying. Developers dont actually code in Notepad, instead we use other Text-Editors that come with support for the programming language we use, so called “IDEs” (integrated delevolpment environement). In our case i recommend Visual Studio Code (not the same as visual studio 2022!). Its a free text editor created by microsoft that allows installing extensions (like a mod) to make working with a specific language easier. So: 1. download and install visual studio code (from google f.e.) 1.1 start visual studio code 2. install the js-doc plugin (it will help keeping an overview) 3. install the eslint plugin (it will help find spelling mistakes) 4. restart visual studio code
Go to File > Open folder, and navigate to your documents/worldpainter/scripts folder. open it. You can see the coloring is different, comments are green, function calls are yellow and variables are blue:
Additionally, the Editor will now warn us if we make writing mistakes (“syntax errors”):
if you get red squiggly lines, hover over them with your mouse and read what it says. Usually it tells you what to do to solve the problem: “the fix”.
Find help
At some point, you will be confused, you get an error you don’t understand or you want to do something which you are not able to yet. Follow these steps to figure out a solution: 1. if its an error, read what the error says. usually it tells you WHAT is the problem and in WHICH line of code it occurs. 2. copy the error/ write down your problem and give it to chatGPT. explain your environement: “im writing javascript for worldpainter in ecma5.1 version, tell me why this code doesnt work: … “ 3. if chatGPT doenst know/dreams bullshit/ you cant figure it out, go to google and search for your problem: “‘,’ expected.ts(1005) javascript”, read articles from other people who might have had the same issues 4. if googleing didnt help either, post your question with code AND error to stackoverflow or a discord
You will have to learn the syntax of javascript and the basics yourselves. We have covered: variables, objects, functions. You should now go and learn yourself about: for-loops, if statements, data types
And if you think something is magic, for example how you give text to worldpainter and it does stuff, let ChatGPT explain it to you. Just be aware the ChatGPT doesnt know THAT much about worldpainter and will lie to you. Use it mostly for basics about javascript.
NOTHING IS MAGIC, EVERYTHING IS DEFINED AND CALLED SOMEWHERE
Final words
You have learned the very basics of
how to create a script file
how to execute it
what tools to use for editing
where to find help
where to learn more
With this, i leave you to your own adventure, happy coding.
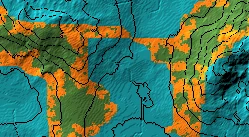
Max Puddle Surface: Lakes will stop growing if they reach this surface area and will not overflow and spawn new rivers.
Smaller value: smaller lakes, rivers might not reach ocean
Minimal River Length: Dont apply rivers that are shorter than this
Spawn Probability: Chance for a river to spawn at a cyan annotated block.
1000 = 1 block for 1000 cyan blocks will spawn a river.
1 = 1 block for 1 cyan block will spawn a river
Flood Puddles: Puddles (Lakes) will be filled with water
Apply Rivers: Rivers will be filled with water
Apply as Annotations: Rivers and Puddles will be annotated in Orange and Purple
Ocean Water Leve: Rivers will stop once they reach this height. Should match your ocean level.