World Painter For Vintage Story works by using a script to generate an intermediary file for World Painter,
which is then read by the mod to guide the game’s world generation algorithms into generating the map you created.
Check it out at vintagestory.at
Category: Tutorial
Navigate
Category
Tag
API automation caves chunk collab custom-object-layer dannypan distant-horizons export github grayscale heightmap import java javascript legacy loot mapsize mca-selector merge new-feature noob ocean optimize ores plugin populate read-only region render river rivers schematics script scripting structures super-flat TODO tutorial vanilla-transition vintage story water worldedit
-
Export for Vintage Story
Export maps made with World Painter into Vintage Story!
Details
-
How To: Plugin Developement
How to develop a plugin for worldpainter
Details
This post will give you an overview on how a plugin for worldpainter can be developed and what you need to get started.
A worldpainter plugin is like a mod for worldpainter. It is written in java, compiled into a .jar, placed into worldpainter/plugins folder and loaded automatically by worldpainter when the program starts.
It is much faster than the worldpainter scripts and allows to add to worldpainters functionality. This includes (but is not limited to):- add new operations
- add new layers
- add new custom layers
- add new layer editors (GUI)
- add new exporters
- add new custom object providers
a showcase on whats possible with plugins: MacroMachine in 100 seconds
Prerequisites to plugin development
- You must be able to write, compile and run java code
- Java IDE (recommended Intellij Community or Ultimate)
- Maven installation
- Worldpainter installation
- Git installation
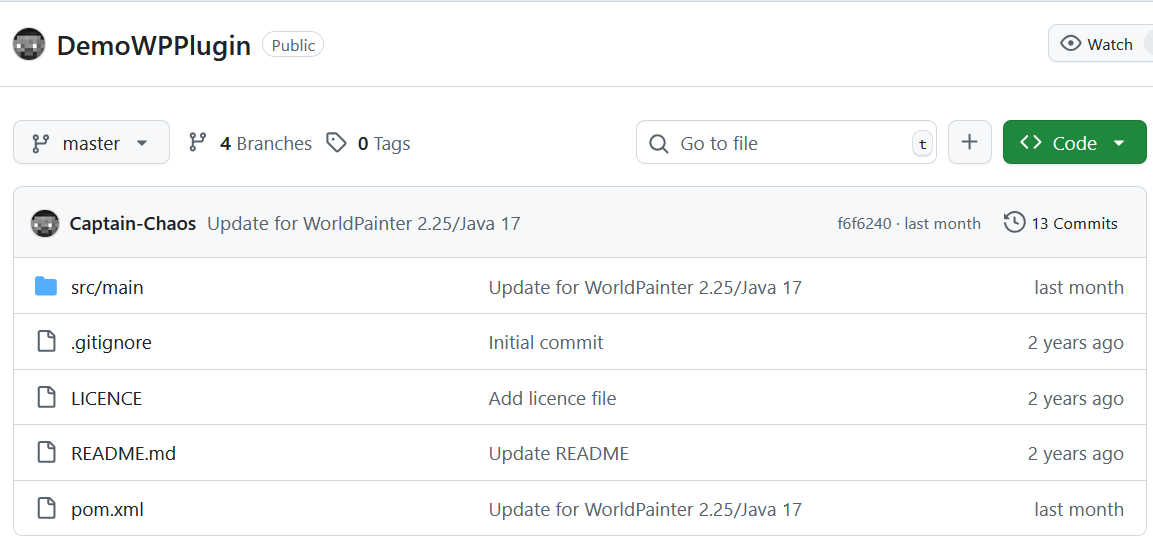
This github repository contains an example plugin set up by CaptainChaos (the worldpainter dev). It showcases whats already possible with the worldpainter plugin API. Clone it locally and you can extend it to your needs:
DemoWpPluginClone the worldpainter repository, so you can search in it how the code works:
Worldpainter RepositoryWorldpainter uses Java Swing for its GUI, if you want to make a complex plugin with custom GUIs/Editors, you might want to learn how Swing works:
Java SwingThe community has only recently started to publish plugins. As of now, only the first 4 have releases (that i know of):
- Custom Garden Layer
- Expand Layer
- MacroMachine
- CubicChunks
- MineTest Exporter
- WorleyCaves
- WurmUnlimited Exporter
- Slabify
Update Jan 2026:
A couple plugins exist now, check out the plugin category!Setup
See this README file for the necessary steps to set up the required maven dependencies:
READMEWorldpainter uses JIDE Dock, an external framework in its GUI. The problem is, that you cant just download JIDE from maven, because the source code is closed-source. The offical worldpainter guide suggests to contact JIDE, get an open source license and the dependency jars from there. I tried that, their forum looks dead and they never activated my account or contacted me back.
Instead, you can use the .jar files that come with your worldpainter installation. For compiling you need the files for windows AND linux (but worldpainter only installs the required ones), so i provide the .jars in this repository, you need to download all 3 jide .jars:
repositoryAfter downloading, you need to install the jide jars with maven, so that maven can find them when looking for dependencies (see README file tutorial above)
If you have no experience with maven, get some basic tutorials in on how to use it. AI is really good now writing POM.xml
Developement
After you have made your changes to the code, you can use maven to start a worldpainter that has your current plugin loaded, to test it inside worldpainter.
Use maven test with the testWithWorldpainter profile.
The release profile is the one used for compiling release artifacts.The most relevant classes to do things inside worldpainter is Dimension.java
It represents the currently loaded project and you can read/write terrain, height, water, layers etc in it.Warning: The worldpainter plugin API is not perfect. Some things are wierd and you have to go to great lengths to make simple things work. Often times things are set private that you need access to.
You can contact CaptainChaos and ask if there is a better solution, he is willing to adapt the API to make things easier.
The current core idea (as i understand it) is that your plugin and classes implement certain interfaces (like CustomLayerProvider or BrushOperation), which worldpainter will use to integrate your new functionality into the existing framework, like offering a new brush operation.Releases
Worldpainter has a signing mechanism for plugins. It will refuse to load any plugins in the worldpainter/plugins folder, that are not virtually signed by the worldpainter build server. The official reason for this mechanism is to prevent malware being loaded in by unsuspecting users. So far CaptainChaos has not expressed interest in removing this obstacle.
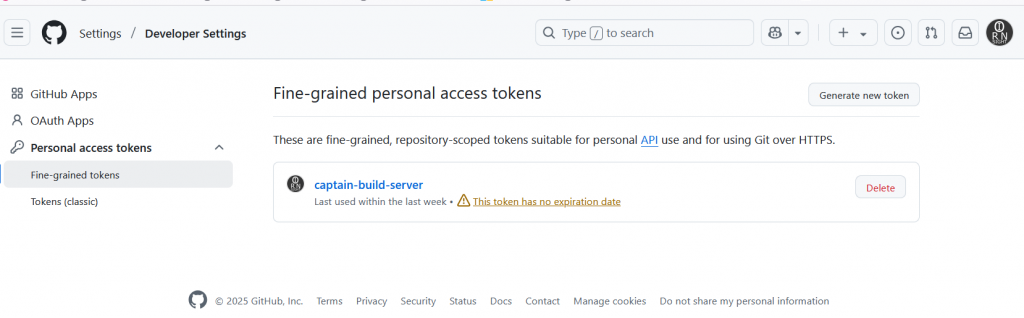
In order to get your plugin signed, you need to contact CaptainChaos (use reddit or discord). You need to set up a way for the build server to push the build-artifact to your github repository. I use a fine grained access token, which grants the buildserver write access to my repo (which is a security risk, but whatever).
The build server will detect any pushes to a specific branch you chose, and then build a release for that push every time.
I use a separate release branch, that i only push to whenever i want to make a release.
Once the build server is done, it creates a release in your repository that has the signed .jar artifact attached. Users can then download the jar file and use it in their worldpainter.A workaround to load unsigned jar files, is to add your jar file to the worldpainters class path. Usually you dont need that because you can start wp + plugin form your IDE. In case you need it: get the command line arguments used to start wp with testInWorldpainter, add you own jar file to the class path, combine the command line so it can be run in powershell or whatever you use. Then start the normal worldpainter.exe using this command line. Worldpainter will accept any plugin that is part of its classpath, unsigned or not.
Relevant technologies
This section is targeted at less experienced java developers.
- If you dont understand something (including steps in this tutorial) let AI explain it to you.
- Learn Java Swing if you want to make custom GUIs.
- Set up JUnit tests in your repository, dont test manually by hand but automate it instead
- Learn how to use the debugger, stepper and breakpoints (with conditions) in Intellij
- Use hot reload
- Use the VisualVM sampler to performance-profile your plugin to figure out what bottlenecks limits the performance. Dont guess where bottlenecks are.
- You can attach to worldpainter with your intellij debugger to debug worldpainter itself. For that WP must have been started with a cli parameter that allows debuggers to attach to it:
-agentlib:jdwp=transport=dt_socket,server=y,suspend=n,address=*:5005
using the testWithWorldpainter profile does that. - After making a release, download the jar and test in normal worldpainter a last time before publishing. Sometimes it behaves different than when started from the IDE, f.e. regarding writing files that live in the jar to HDD
-
How To: Java 21 and Worldpainter install
Find out which version of worldpainter and java you need
Details
Note: Only for windows. If you are on Mac, good luck. If you are on linux, you probably know how to get java
Find out if you need 32bit (x86) or 64bit(x64)
- press win+R (small dialog pops up)
- type cmd
- enter (black window opens)
- in the window, type “wmic os get osarchitecture” without brackets
- enter
- output should look like this:

output will tell you if you need 64 or 32 bit java version + worldpainter version
If you are on win11, type this into the console instead (all one line):Get-CimInstance Win32_OperatingSystem | Select-Object OSArchitectureFind out which java version you have installed
- press win+R (small dialog pops up)
- type cmd
- enter (black window opens)
- in the window, type “java –version” without brackets
- enter
- output should look like this:

I have java but its not 17 or 21, but an older version, probably java 8
This official windows tutorial shows you how to uninstall a program.
Search for “java” and uninstall any java that is not say 17 or 21.Download and install the correct java installer and worldpainter installer
- Go to this website: https://www.worldpainter.net/
- Find the downloader for java AND for worldpainter for windows that matches your version: 64 or 32 bit
- Download java installer
- Download worldpainter installer
- Double click the java installer and install java
- Restart your computer after java finished
- Install worldpainter, it should automatically find java

if any of the above steps dont work as expected, make a post in #help-and-troubleshooting
please include screenshots of all steps.
if you do not include screenshots, we can not help you -
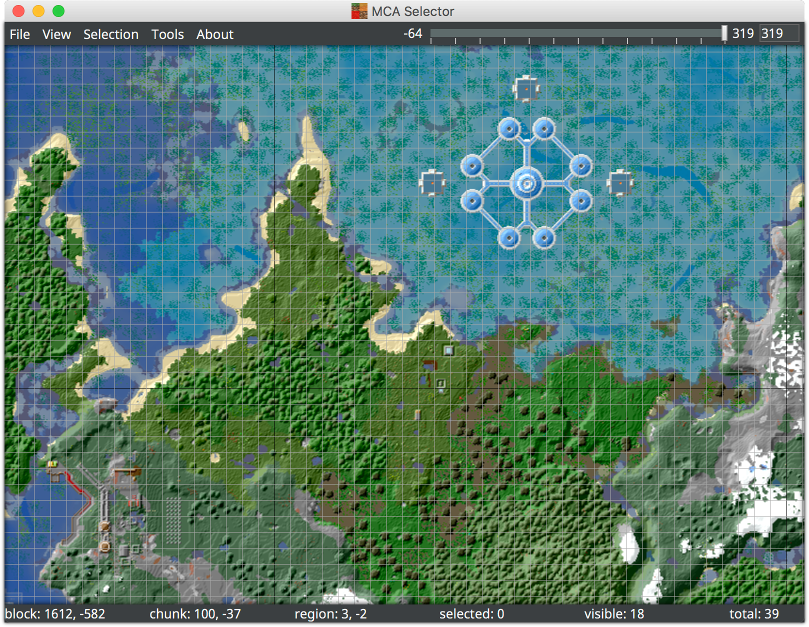
Merging worlds with MCA Selector
Basics of merging two separate worlds using MCA Selector
Details
Motivation
why would you want to merge two worlds in the first place?
- you have an existing minecraft map, that you want to edit in worldpainter. You have some areas with existing build that you want to keep, the rest you want to create your own terrain.
- Your project is to big for worldpainter to handle at once, so you split it into multiple, smaller projects and merge in the end
- You want to combine two (or more) existing maps
How to
There is no smart automation for merging. You have to define which chunks you take from world A and write it into world B, using MCA Selector.
The easiest way to go about it is to create a world in worldpainter, that smoothly connects to the existing chunks, and then use MCA Selector to combine the old world and the new world.
Import your old world into worldpainter and mark all existing chunks with read only. Add new tiles around that and shape the terrain to transition smoothly.
Try not to change the read-only chunks terrain shape.
Export your worldpainter world, and make sure all chunks for the old world (that you want to keep) are marked as “read only”
That way, the exported world is missing these chunks.Open the exported world in MCA Selector. Check that it has the holes where the old-world-chunks were.
Select all chunks that you want to bring over into the existing world.
Save the selection to your harddrive in a place where you can find it again.Open the existing minecraft map. import the selection. import the exported world with “only import selection” option
Voila.technicalities
you have taken the selected chunks from the exported world, and used them to overwrite the existing chunks in the old world.
That is the easiest and cleanest way to merge worlds or to edit existing maps.
The merge feature in worldpainter does a similar thing when executed with “overwrite” but it is buggy and in the past has failed me multiple times.requirements
https://github.com/Querz/mcaselector/wiki
-

Importing a heightmap from image
Learn how to import a grayscale heightmap image into worldpainter, what image file types to use and how to convert incompatible ones
Details
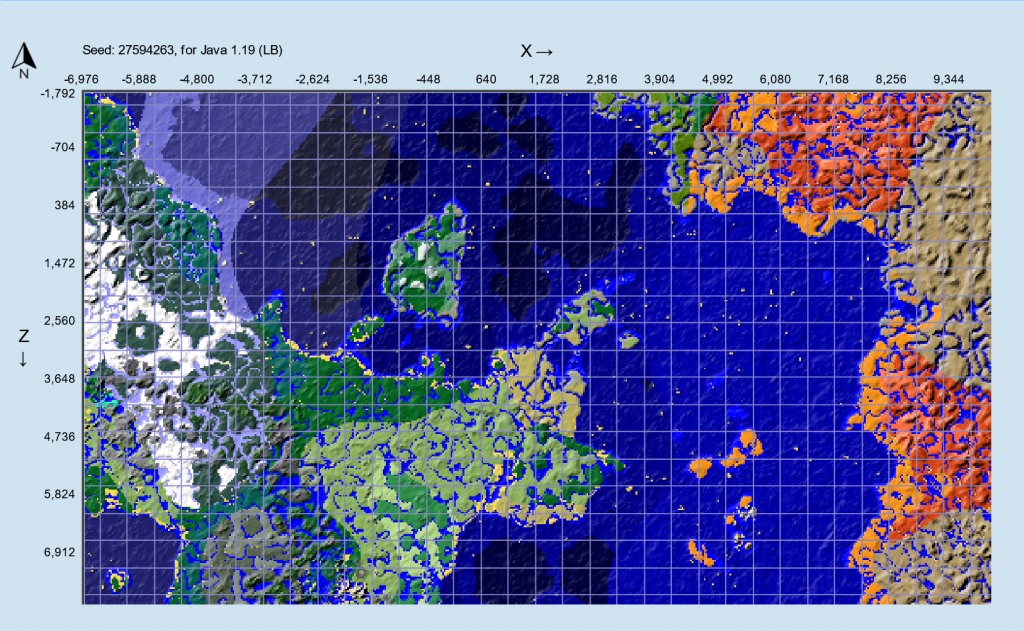
In worldpainter you can either sculpt the landscape with brushes by hand, or you import an existing heightmap from an image.
These images are grayscale images, where the color value corresponds to the height of the pixels position. Bright means high, dark means low:
And after importing such a heightmap to worldpainter, it looks like this:
Note: i painted the terrain, you import only elevation, nothing else.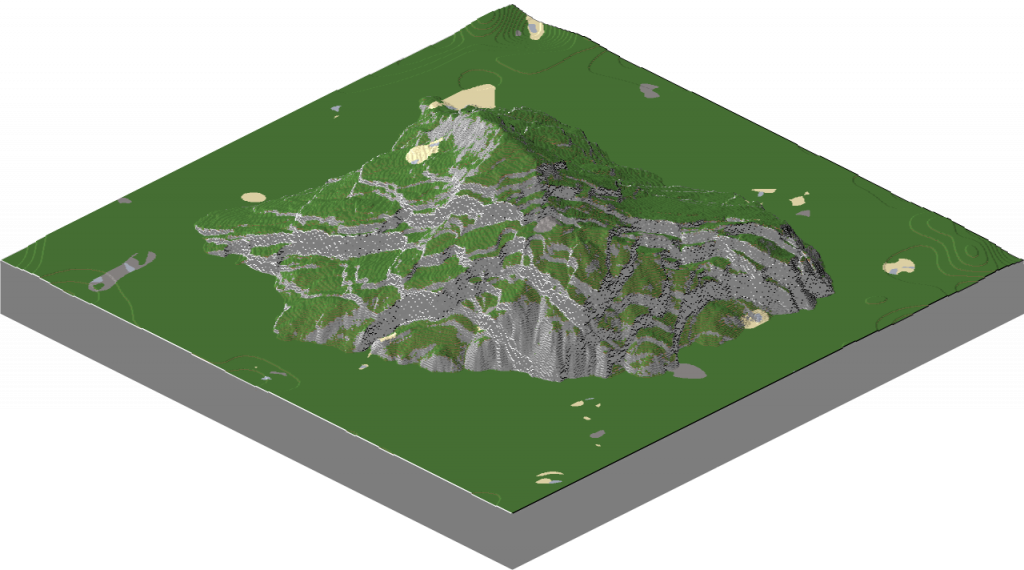
Importing as a new world
You can import the heightmap by selecting File > Import new world > From heightmap. Then you get an import menu where you can change the horizontal scaling of the map and the vertical scaling. This feature serves to start a new world with an existing heightmap.
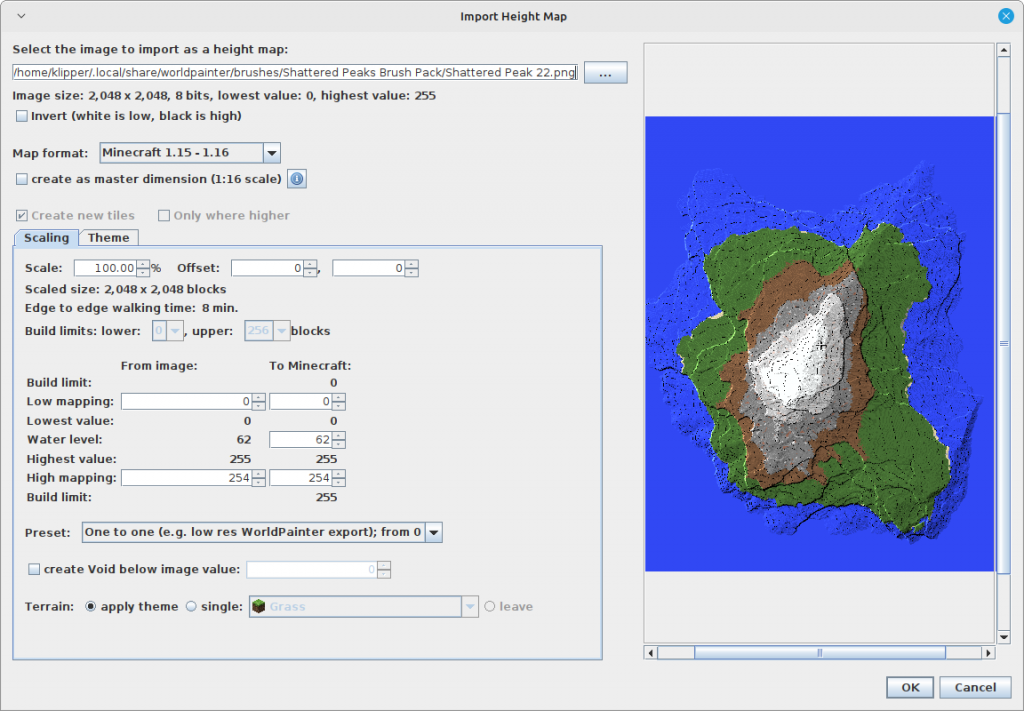
Importing into an existing project
If you already have a project with a map and you dont want to start new, but want to import the heightmap of a mountain into the existing project, there is a feature for it as well:
Edit > Import > Heightmap
The import menu is the same, but it will be added to the existing heightmap and not create a new world.
Some artists claim that importing a heightmap is the better process than using brushes, because brushes sometimes cause “banding” where steps along an elevation line appear.
In my opinion, the import heightmap feature is very clunky and you are better off using brushes.Technical background
Grayscale images for heightmaps are not only a worldpainter thing, but are used in other software as well.
A.png image uses lossless compression and saves each pixel with its color dinto file, where the color is a list of numbers for each color channel, usually 3 or 4 numbers for RGB or RBGA. JPEGs for comparison use compression that produces smaller files, but will also loose information, colors might change slightly and over time the image quality degrades.
Worldpainter reads the color of the pixel and derives the height from it. Im not 100% sure what worldpainter does, but usually you take red-channel from the RGB (red green blue) color and get a number between 0 and 255 for 8-bit-per-channel PNG files. then you use that as your height value. 16 bit channels allow 0 to 65536 values, so if your mountain is higher than 255m, use 16 bit, otherwise you will get banding or other artifacts.
PNG images support many different color-export-settings:
8-bit-per-channel RGB, 8bpc-GRAY, 16bpc-rgb and more.
You want to use 8bpc RGB or 16bit per channel RGB. Im fairly sure worldpainter can handle other formats as well, but i cant guarantee it.
“The image should be 8-bit or 16-bit grey scale with no alpha channel for optimum results.” – from the worldpainter website
If your grayscale image is NOT compatible with worldpainter, you can use GIMP or Photoshop (or maybe even paint) to transform it:
Import the image to GIMP, then export as a PNG with 8 bpc RGB or 16 bpc RGB -
Editing an imported world
Follow me as i import my survival world into worldpainter and edit the forest on a large scale to improve how it looks, then export back into the existing world. A basic tutorial for import/merge/export in worldpainter.
Details
I recently took a dive back into minecraft survival. I play on a locally hosted paper-server with minecraft 1.19.3 and my favorite plugin of all time: Extra-Hard-Mode.
It makes survival a lot more interesting, resources more scarce and mobs a LOT more dangerous. Anyways, i played a week of survival and then decided i didn’t like the boring procedural minecraft terrain anymore.There is a major problem:
Every hill and every forest looks the same. You can explore the world in 2 days with a boat, after you have seen all biomes once, every new chunk looks similar to something you have seen before.And the terrain looks bland. There are no surface spots where you go “damn its beautiful here”. No hidden lakes in a magical forest, no glittering mountain peaks in the distance or enourmous waterfalls.
This needs to be fixed.
How? Worldpainter.The plan is to edit existing terrain, leaving man-made chunks untouched and merge back into the existing world. I haven’t done this before, but im sure we can figure it out.
This post acts more like a diary than a tutorial, because im to lazy to explain how to set up a paper server etc.Preparation
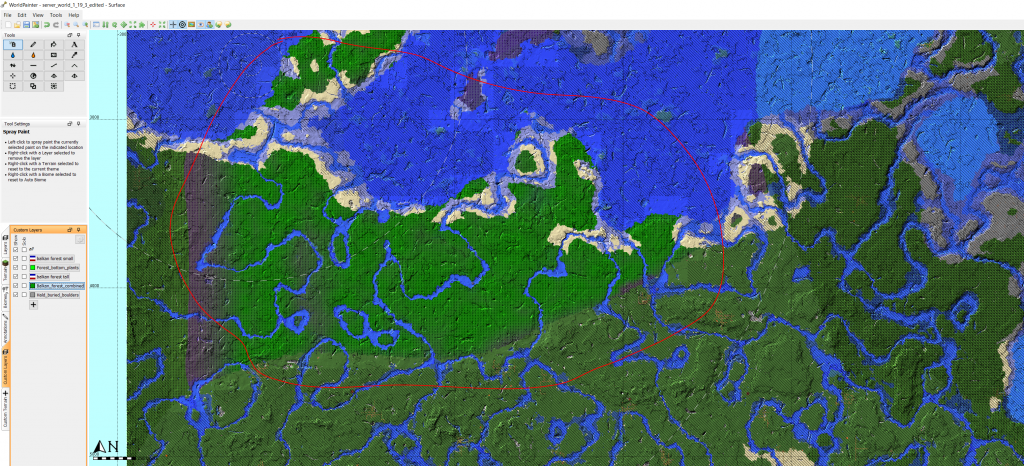
I know from experience that its not easy to seamlessly merge your own landscape into existing vanilla chunks. So the first step is to generate vanilla terrrain in a large square around my home, which i will then edit. It acts like a painting canvas and ensures we dont mess up transitions between edited and vanilla landscape. For that I use the chunky-plugin (which also exists as a forge mod) with a radius of 3000 m around my home, so a square of 6 x 6 km.
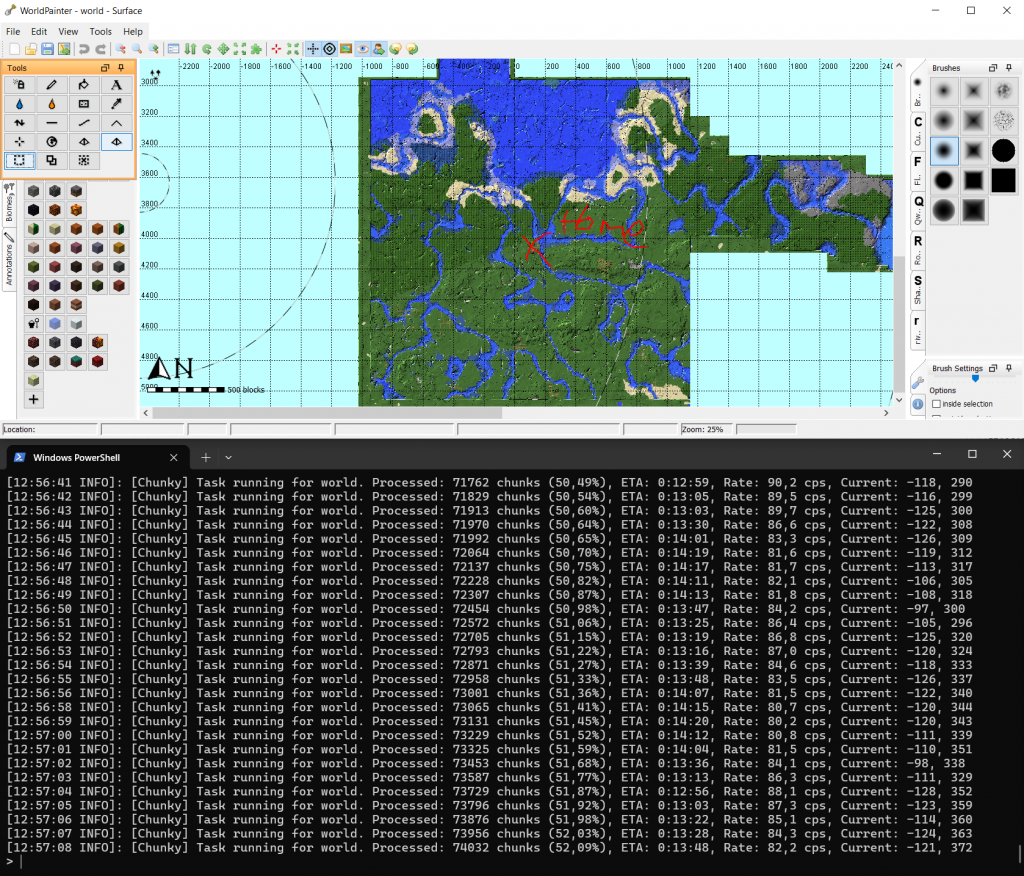
And after waiting a bit, I get this:
[13:09:42 INFO]: [Chunky] Task finished for world. Processed: 142129 chunks (100,00%), Total time: 0:22:27
6 square kilometers of vanilla terrain generated around my home base.
After finishing the generation, this is our 6x6k “canvas” world which we will edit: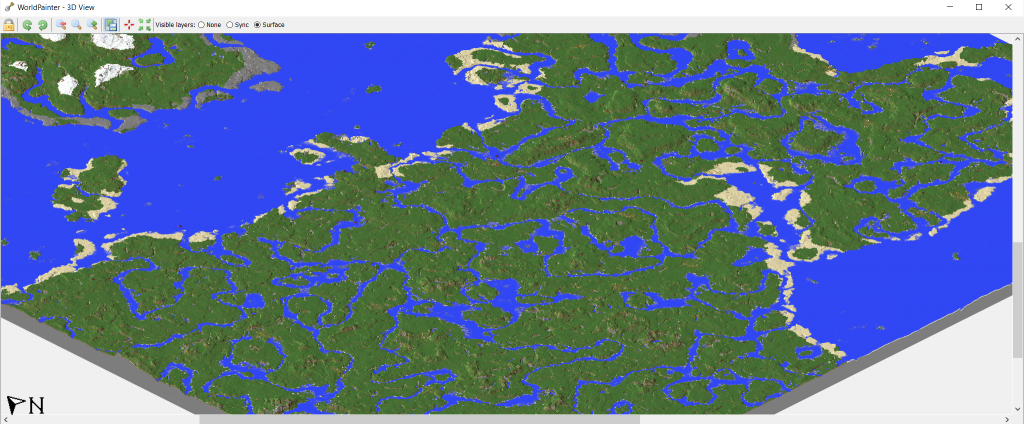
Im surprised how good the vanilla rivers look from afar in the birds perspective.
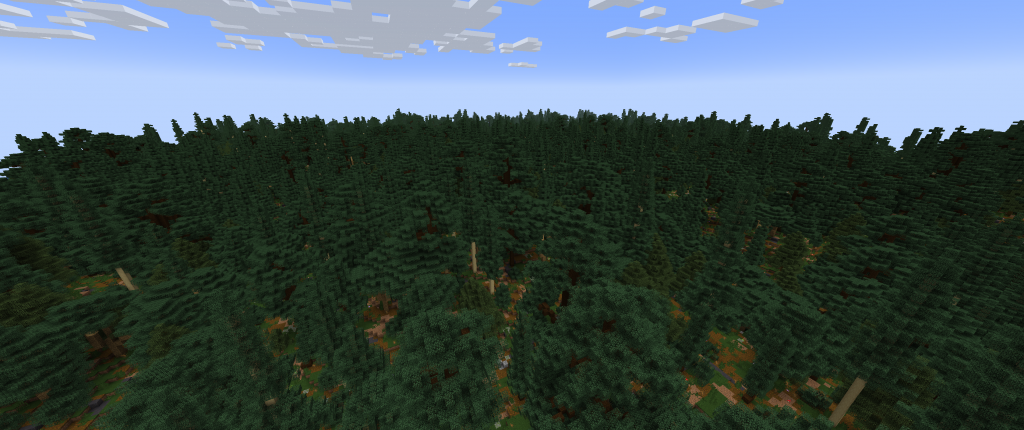
They still look pretty bland from survival, just shows how birdseye-perspective and survival are two pair of shoes. (and so are beautiful raytraced renders and survival 😀 )Forests
Lets give my forests a make over.
Two things about vanilla forests bug me a lot:
– The trees are tiny and look more like an apple garden
– The ground is similar to plains, thats not what a forest looks like
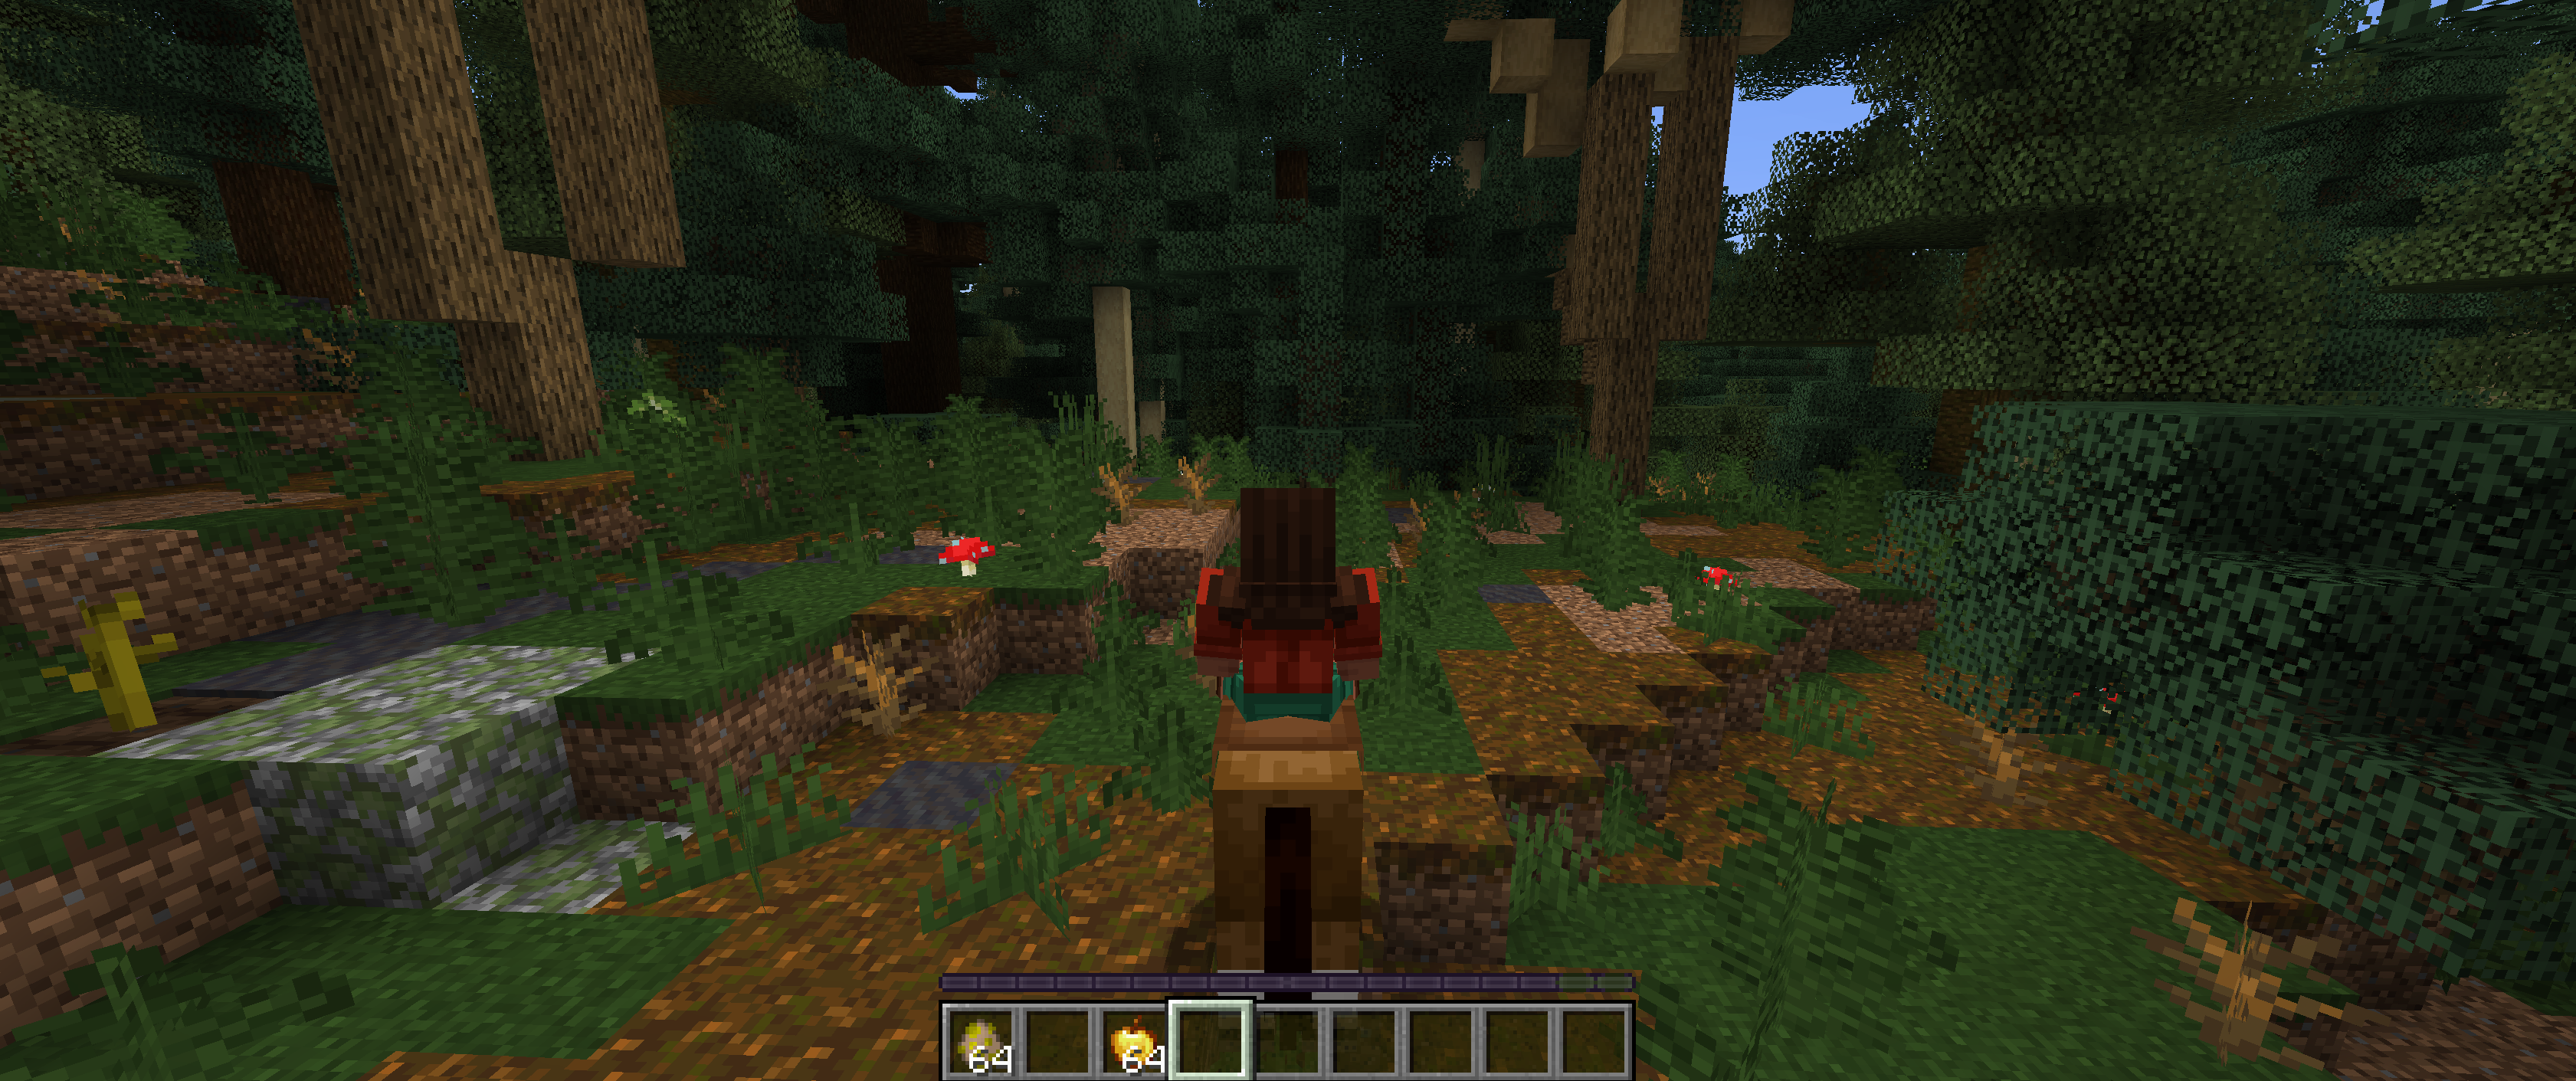
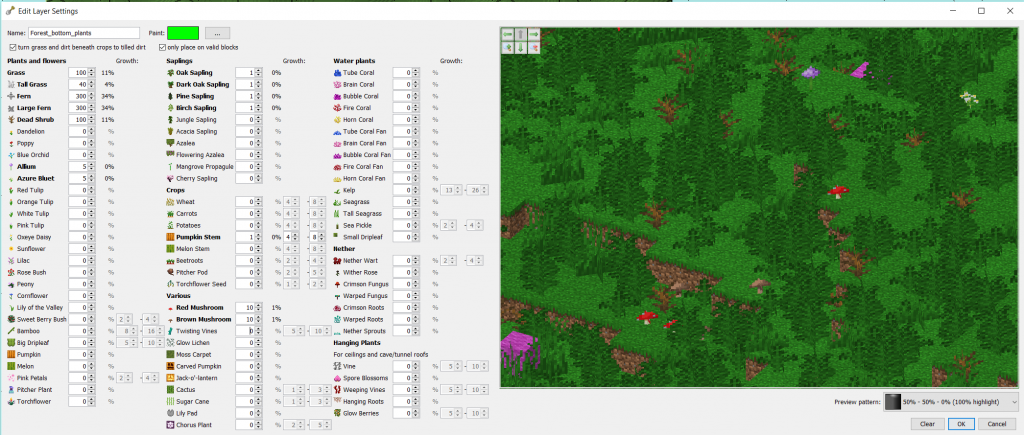
When im thinking about a forest, i think more of tall trees, closed canopy, shadowy light and rotting leafs on the ground. At least thats what Arte tells me wild forests in Poland and Slovenia look like.So lets make a layer in worldpainter that looks like that.
For that i make a new default worldpainter world, i create the layer there, save it to files and afterwards import it into my server-world project.First some plants which i expect to find on the ground in a forest. The values are only based on what i visually like in the preview. Mostly i want ferns, some mushrooms and then some sprinkeled extras like pumpkin and flowers.
Now lets get some trees up. As always for trees, i look to the artist i trust with trees, Paleozoey. I find a treepack created by her on the discord with european forest trees and download it:
https://www.planetminecraft.com/project/trees-of-europe-survival-friendly-schematic-pack-for-worldpainter-etc/
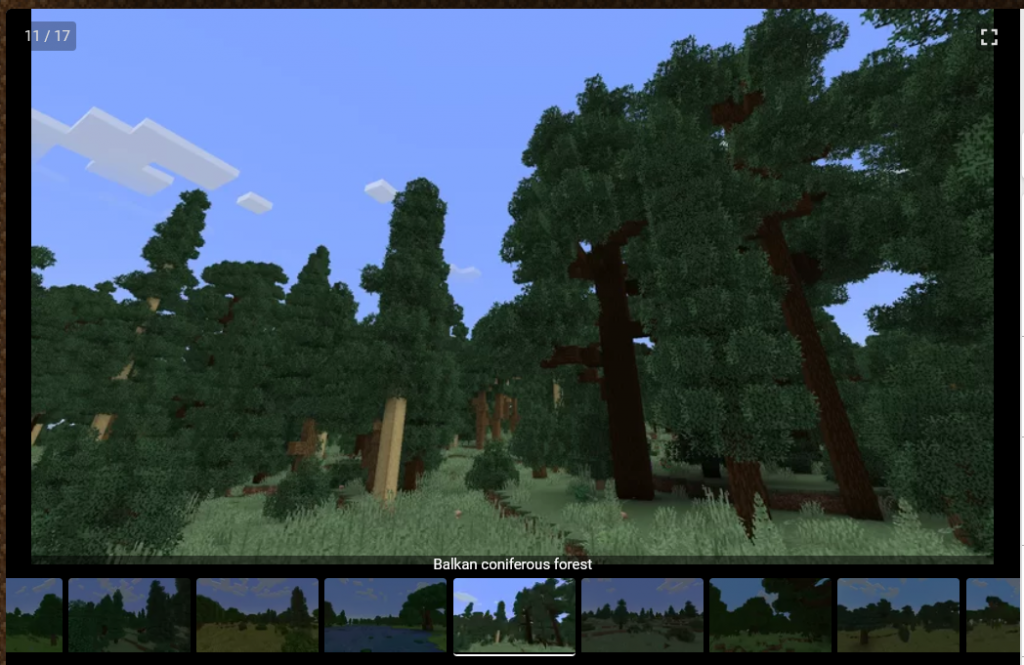
The pack even comes with premade .layer files we can import, which saves us the hassle to figure out which trees go into a “balkan coniferous forest”.I like the looks of the balkan forest from her showcase, so i use that layer
And finally, the forest floor terrain.
I want it to be darker than grass, so a mix of grass, mud, some stone maybe.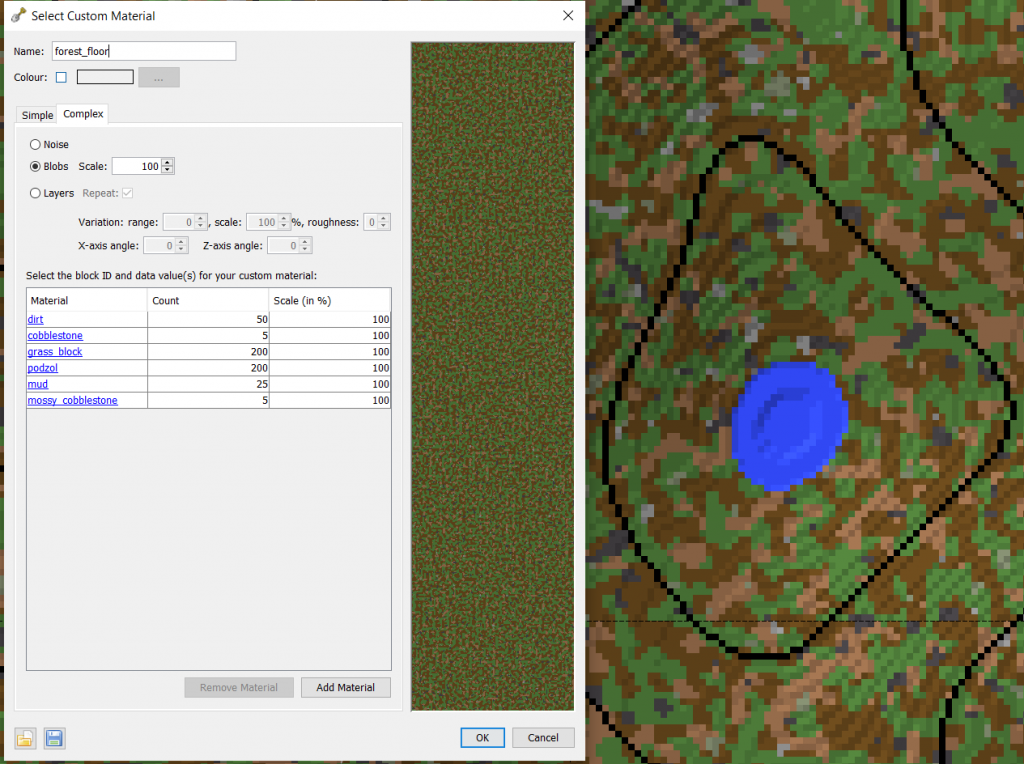
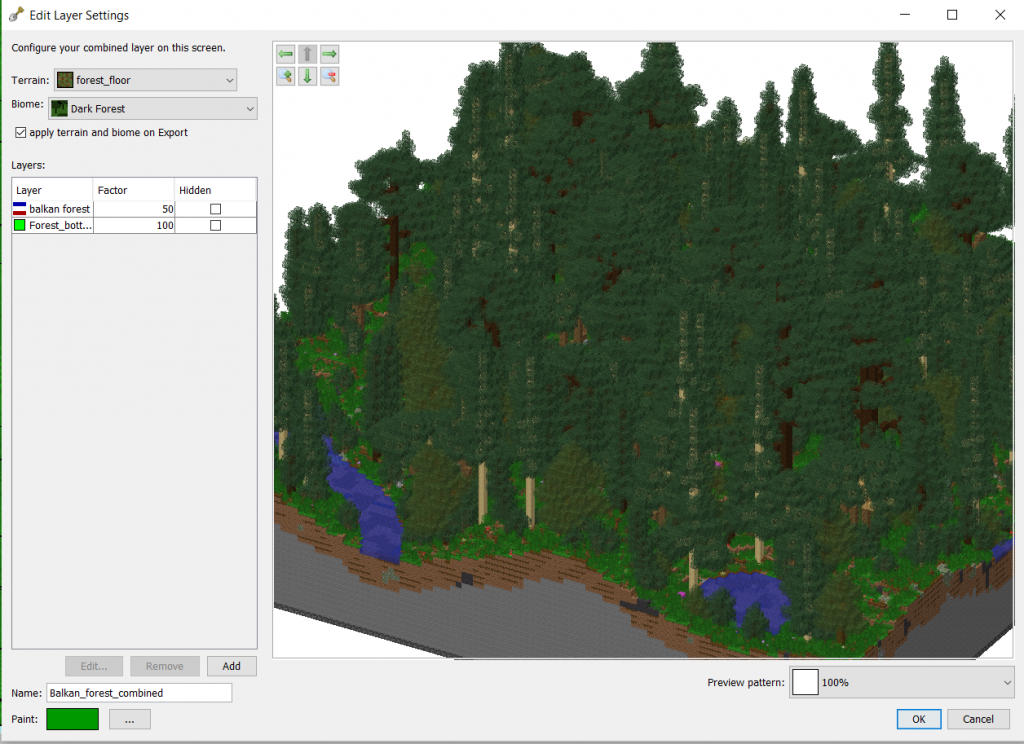
And now combine all three into a combined layer we can easily reuse.
Looks pretty nice already, and a lot better than vanilla oak forest:
Lets do a first test export and see how it looks ingame.
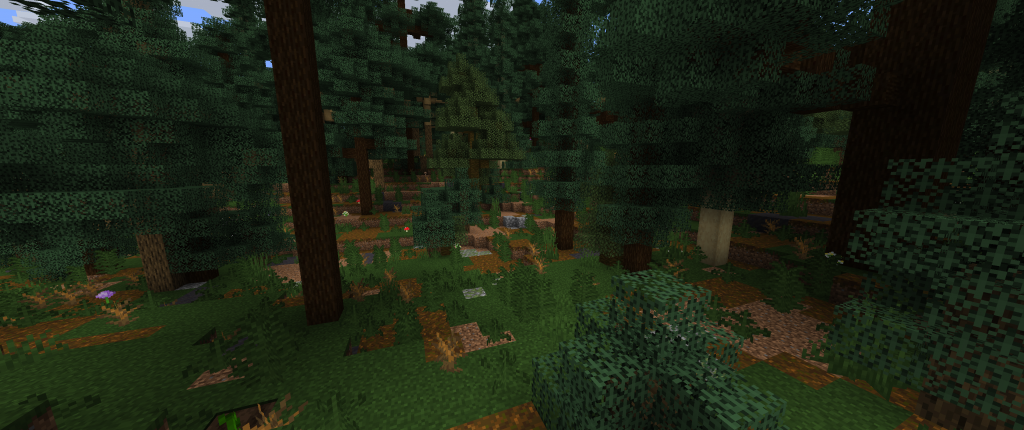
Fast forward 3 hours and finally i have the layer looking like i want it to:
– interesting plants at the bottom
– non bland floor
– sparse enough so horseback travel is possible
– dense enough to feel like a shaded forestI have split the trees into tall and small, so i can more easily control how much “high canpoy” and “annoying tiny christmas trees that block way and sight” i get.
I messed up a bulk operation and set my trees to 100% random y variation, which caused them to sink into the ground randomly. Took me quite some time to figure this out.
A good method was to set up each separate layer to look correctly in preview, then do a test export with just this layer at 100%.
After all layers are checked, do a combined layer export and make sure the export order for the layers is correct. For me its boulders -> large tree -> small tree -> bottom plantsExporting and merging
I have spray painted the new forest layer into my imported worldpainter map, everywhere where “biome is forest”. Then i paint “readonly” on all chunks EXCEPT where the new forest is. That ensures that only exactly the “edited” chunks are exported.
Lets do a first export into the world as we know it. I choose “test export” and mark only the tiles where my homebase is. This creates a new minecraft map with the same seed as the imported and it will have at start only our exported forest tiles.
When we load into the world, minecraft will generate the rest of the world around us based on the seed.
So we will see a new world with our forest in it.
The village is my homebase in the serverworld, where i have built a fortess.
We can see the new forest smoothly blending into the terrain.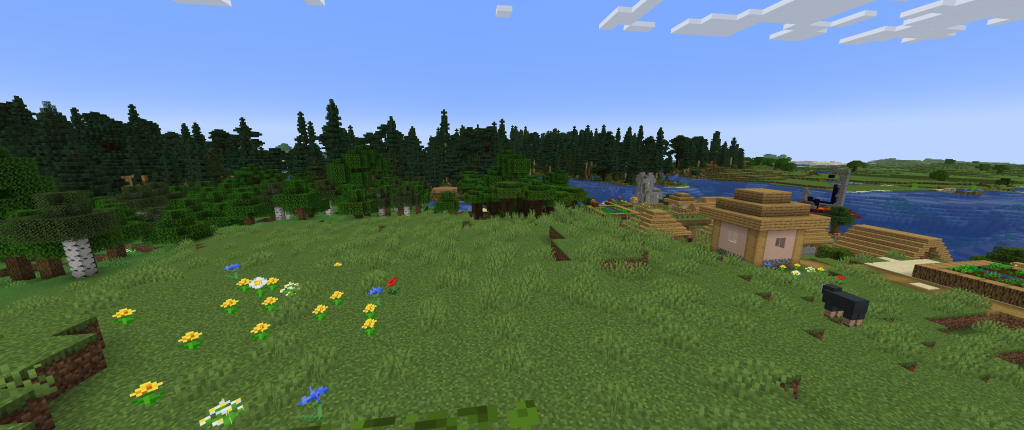
Lets to a proper merge into a serverworld. I have backed up my world at the very start before doing anything else, rumour has it that merging is not stable or encouraged.
And this is what it looks like after the merge.
I have not found artifacts where the chunks merge, the transition is invisible so far.
What i did notice, is that my “cave 50%” layer is to much, there is a lot of small spaghetti caves in the forest.
But thats fine to me, extra hard mode is extremly cave-exploration focussed so im fine with more being generated in the forest.Anyways, this is it for my first step: Forests.
Next time, ill do mountains. -
Learn to script from zero
In this tutorial, we will create a first script and learn the very basics of javascript in worldpainter
Details
This tutorial is for people who know nothing about scripting/programming.
I will explain the very basics starting from zero and in the end you will be able to create small scripts for worldpainter by yourself, you will know all the relevant tools and where to find help if something doesn’t work.To start out you only need worldpainter installed and a text editor, windows comes preinstalled with Notepad (dont use word).
Creating a first script file
Worldpainter has the ability to run scripts by executing javascript files:
Such a script file is essentially a text file with a .js ending that contains code. When executed, worldpainter loads that file, reads it from the top to the bottom, line by line and then executes it. This holds true for most programming languages, its always top to bottom, left to right, statement by statement.
For javascript and worldpainter, it doesn’t matter where the file is saved, only the contents of the file (the “text”) matters.Fun fact: file extensions dont really mean anything. Sometimes programs expect them to be a specific ending, but you can rename a .js file to .txt and open it with word. (Word is not a code editor, please dont use it for that). This holds true for programming files, but not necessarily for other stuff. docX word files are actually zip folders, etc.
We can open and edit these files or create them by ourselves. For starters, open your text editor (or notepad, NOT WORD!) and create a new file called helloWorld.js in a folder where you can find it again. It might make sense to create a mydocuments/worldpainter/scripts folder, to stay organized:
And thats it, you can load and execute this script file now in worldpainter. Hurray!
Of course it doesn’t do anything yet, so lets change that.
So, we know that code is read top to bottom, left to right.
Now how do we make it do something?print("hello world"); print("this is my first program");add that to your file and execute it in worldpainter.
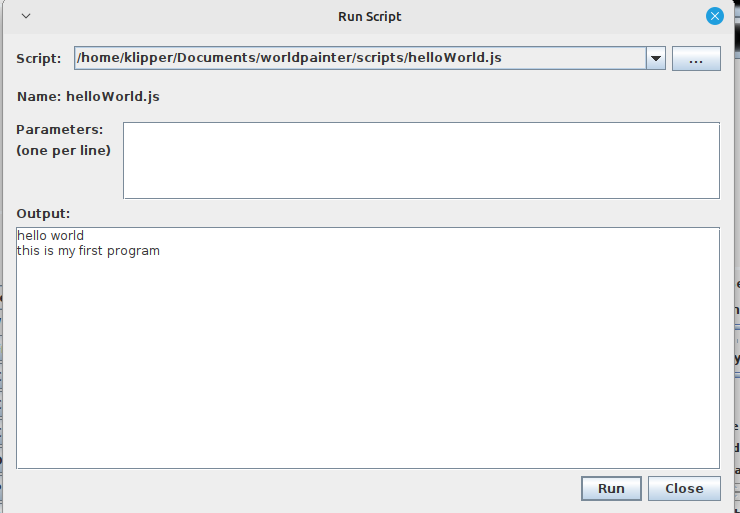
So we see in the output that the first line was executed first, and the second after that. Notice the “;” at the end of the lines. In javascript, this is what ends a statement. A statement is a single instruction that tells the computer to do something.
The computer reads (“parses”) the script file from top to bottom, left to right, but in the end its the ; that defines where a statement starts and ends.
We could rewrite our code like this and achieve the same output:print("hello world"); print("this is my first program");For readability, programmers have come to write ONE statement per line.
Its purely a formatting thing, but its a standard that will make your life easier in the long run.
So back to this we go:print("hello world"); print("this is my first program");To make understanding code easier, programmers use comments in their script files.
Every line that starts with // is consideres a comment in javascript and will be ignored by the computer when reading the file:// i am a comment // this line is ignored: print("i am ignored") print("hello world"); //comments can go anywhere print("this is my first program");Variables
So far we haven’t done anything useful.
Lets do some maths, that basic building block of all programming.
First we declare a variable and then do something with it://define the variable var myVariable = 5; //print it print(myVariable); // assign it a new value myVariable = 10; print(myVariable); //do maths myVariable = (150 + 270 + 999 - 42 + 4) * 30,462708182; print(myVariable);The pattern is always the same:
first you define the variable, you tell the computer that it exists:
var myName = 12345;
after that, you can assign new values to it.
Every variable that you used MUST first be defined before you can do anything with it, similar to a function.
Its always the same: first define, then assign, then use.Functions and code blocks
Now what is that print( ) thing we did? Its called a function.
A function is a block of code that is defined somewhere (in this case worldpainter defines it without us seeing it in our own code). We can call functions like this to execute the code inside them and give them parameters.
1. print is the function
2. “hello world” is the parameter
3. print(“hello world”) is the function-call.
a function itself doesnt do anything on its own, unless it is called.
Lets see this in action.
First we define a function, we call it doSomethingfunction doSomething() { print("hello world"); print("this is my first program"); };The function definition usually goes on top of the file, so the computer reads it first before it is being used/being called.
Now that we have our function defined, we can call it:function doSomething() { print("hello world"); print("this is my first program"); }; doSomething();the { and } brackets define the start and end of a code block.
print is a function too, just like doSomething. The difference is that it is defined by worldpainter, outside of our code and we can use it without having to define it ourselves.
The main purpose of functions is two things:
– make code easily reusable
– make code more readable by grouping code that does one thing into a properly names function.
Usually, when the computer has finished executing a script, it will “forget” everything that was defined inside the script file.
This is NOT the case in worldpainter, as long as worldpainter runs, it will remember function that you defined in scripts.
Lets create a script that calculate the yearly wage of 3 people:// money danny makes per hour var dannyWageHour = 7; var elmoWageHour = 15; var dieterWageHour = 3.5; // function takes hourly wage as input and returns the yearly wage function hourToYearlyWage(hourWage) { var workHoursPerWeek = 40; var weeksPerMonthAverage = 4.25; var monthsPerYear = 12; var yearWage = hourWage * workHoursPerWeek * weeksPerMonthAverage * monthsPerYear; return yearWage; }; print("danny:"); print(hourToYearlyWage(dannyWageHour)); print("elmo"); print(hourToYearlyWage(elmoWageHour)); print("dieter"); print(hourToYearlyWage(dieterWageHour));
So our function allowed us to do repetitive tasks easily with very few lines of code. That is the essence of scripting.
On top of that, if we want to change the maths, we can do it inside the function and it will apply to all 3 employees. For example when we have reduced working hours to 35 a week, we only have to edit it once.Fun fact:
You can define functions inside of functions inside of functions etc.
They will only exist in the block where they were defined, that is called “scoping”.Objects
The last important building block you need to know about in javascript, are objects. Just like you can group together code (logic) into a function, you can do so with values / variables:
//define the object
var dannyEmployee = {
   name: "Danny",
   wageHour: 7,
   pet: "dog"
};

//get a value:
print(dannyEmployee.name);
print(dannyEmployee.wageHour);
print(dannyEmployee.pet);

//assign a value, danny got promoted
dannyEmployee.wageHour = dannyEmployee.wageHour + 5

print(dannyEmployee.name);
print(dannyEmployee.wageHour);
print(dannyEmployee.pet);

//print the whole object at once
print(Json.stringify(dannyEmployee));
In javascript, objects are defined with key-value pairs:
name is the key
“danny” is the value of the key
key-value pairs are encapsulted with { } brackets and separated with ,
This is called Javascript-object-notation (JSON) and a standard which you can google.Interacting with the worldpainter world
So now that we have the basics covered, we can start interacting with worldpainter. But how?
Worldpainter prepares a way for our script to give it commands and interact with the world:
https://www.worldpainter.net/trac/wiki/Scripting/API
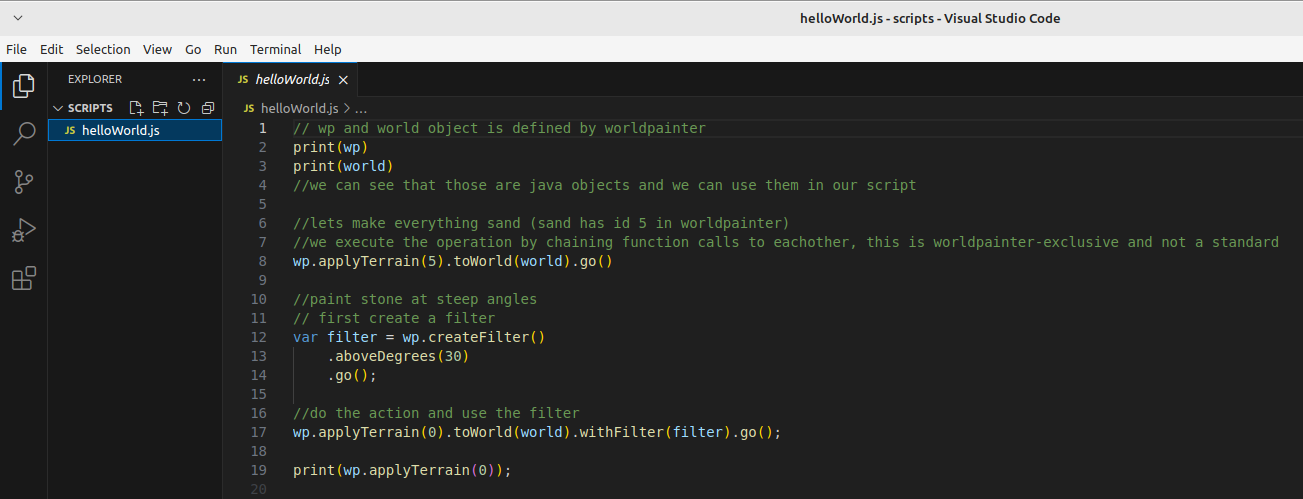
Worldpainter has pre defined a couple of objects and functions for us to easily achieve large scale editing tasks.// wp and world object is defined by worldpainter print(wp) print(world) //we can see that those are java objects and we can use them in our script //lets make everything sand (sand has id 5 in worldpainter) //we execute the operation by chaining function calls to eachother, this is worldpainter-exclusive and not a standard wp.applyTerrain(5).toWorld(world).go() //paint stone at steep angles // first create a filter var filter = wp.createFilter() .aboveDegrees(30) .go(); //do the action and use the filter wp.applyTerrain(0).toWorld(world).withFilter(filter).go();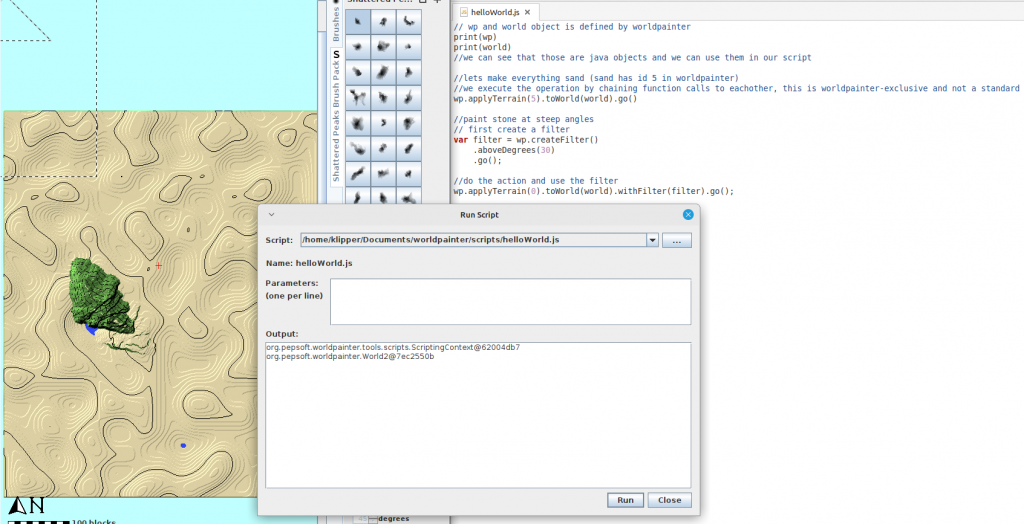
Please note that the chaining of function calls is a worldpainter specific thing.
wp.applyTerrain(0) returns an object of type “MappingOperation”, which we then call mappingOperation.toWorld(world), which again returns a mappingOperation obejct.
In theory we could express the same like this:var op1 = wp.applyTerrain(0); //mapping operation with grass var op2 = op1.toWorld(world); var op2 = op2.withFilter(filter); op2.go();This code is correct BUT worldpainter will throw an error at us. It wants us to do the chaining and execution with “go()” in one step, and will not allow it do be done in multiple steps.
Running javascript outside of worldpainter
So far we know that we can write code, give it worldpainter and it will execute it.
But whats actually going on?
All code in the beginning is just text, as we already discovered. This text is then given to a program thats able to execute code, the Runtime.
In our case, worldpainter has a built-in javascript runtime, a java-library called Nashorn.
Nashorn is a javascript runtime, that can read and execute an older version of javascript (ecma 5.1) AND allows the mixing of java and javascript. This is relevant, because worldpainter is writte in Java, a different language that has no connection to javascript (besides the name), and different programming languages can not interact with eachother by default.
Now, we have written normal javascript files so far, but they are not exclusive to worldpainter. We can run them in other javascript runtimes too.
It just so happens, that all webbrowsers have such a JS-runtime, so we can execute javascript code in our browser.
For that we open a browser (in my case firefox), press F12 and go to console: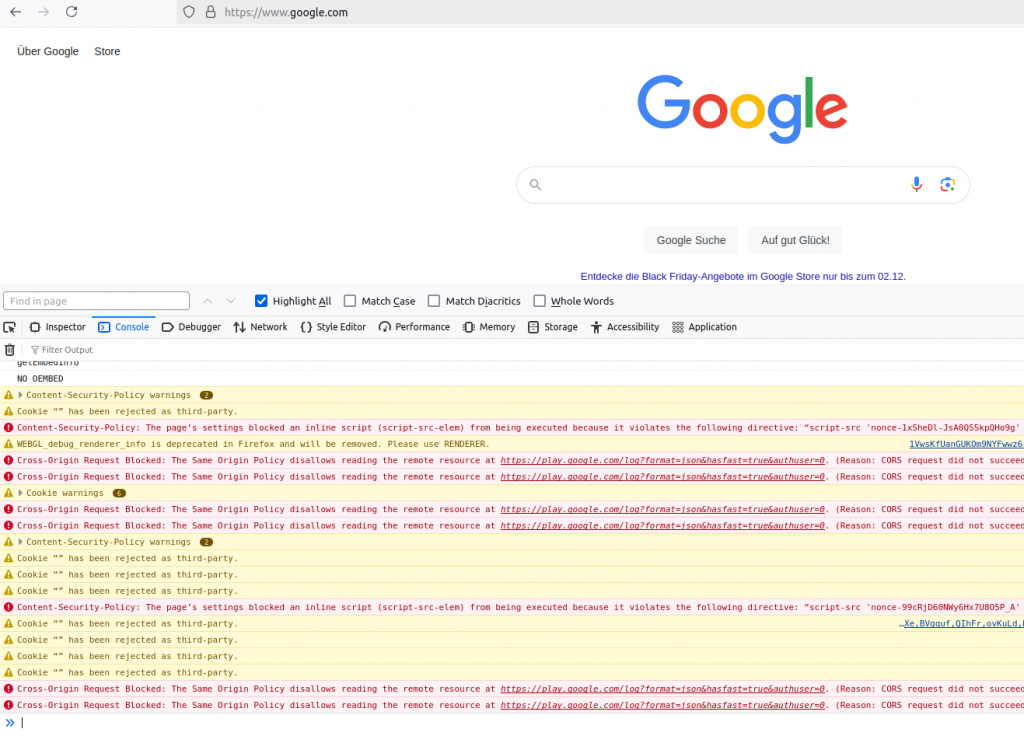
in the bottom window, we have a text input, this is where we can type in javascript, press enter and have it executed:
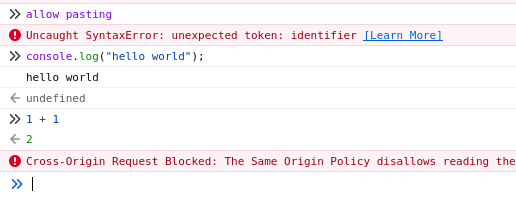
in my case, i had to type “allow pasting” first to paste my clipboard there, because firefox thought i was getting scammed and told to paste stuff i dont understand.
Notice how i used “console.log” instead of “print”?
That is because the browser is not worldpainter, print() has a different meaning here (it prints the page). Instead the node.js – runtime in our browser defines the console object which allows us to interact with the console window:// print("hello world") becomes this in the browser: console.log("hello world");You can also download and install node.js onto your computer and use it over the command line:
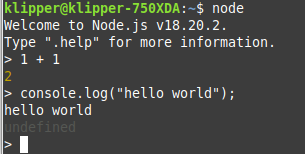
Just a neat little thing to know that code can be executed outside of worldpainter too. Of course you can not use things that are only defined in worldpaiinter such as wp, world or print.
Professional editing tools
So far we have written our scripts in Windows Text Editor “Notepad” (well you have, im on linux).
Maybe you have already made a typo on accident and caused the program to throw an error, or misbehave in other ways. And maybe finding the typo was very annoying.
Developers dont actually code in Notepad, instead we use other Text-Editors that come with support for the programming language we use, so called “IDEs” (integrated delevolpment environement).
In our case i recommend Visual Studio Code (not the same as visual studio 2022!).
Its a free text editor created by microsoft that allows installing extensions (like a mod) to make working with a specific language easier.
So:
1. download and install visual studio code (from google f.e.)
1.1 start visual studio code
2. install the js-doc plugin (it will help keeping an overview)
3. install the eslint plugin (it will help find spelling mistakes)
4. restart visual studio code
Go to File > Open folder, and navigate to your documents/worldpainter/scripts folder. open it.
You can see the coloring is different, comments are green, function calls are yellow and variables are blue: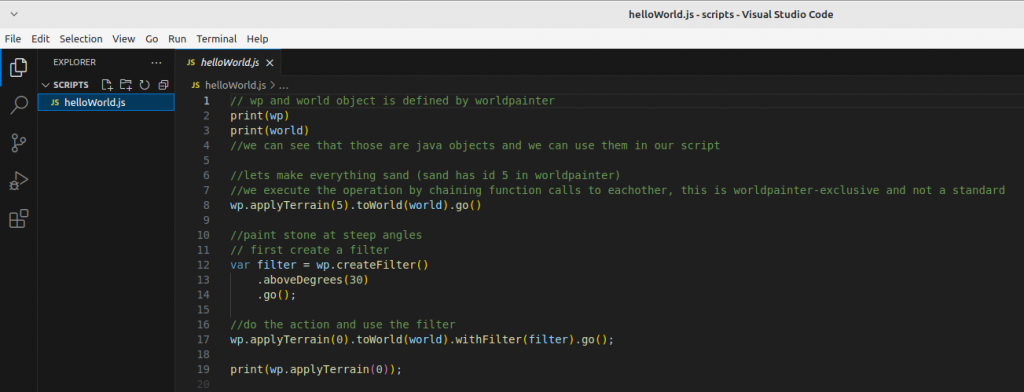
Additionally, the Editor will now warn us if we make writing mistakes (“syntax errors”):

if you get red squiggly lines, hover over them with your mouse and read what it says. Usually it tells you what to do to solve the problem: “the fix”.
Find help
At some point, you will be confused, you get an error you don’t understand or you want to do something which you are not able to yet.
Follow these steps to figure out a solution:
1. if its an error, read what the error says. usually it tells you WHAT is the problem and in WHICH line of code it occurs.
2. copy the error/ write down your problem and give it to chatGPT. explain your environement: “im writing javascript for worldpainter in ecma5.1 version, tell me why this code doesnt work: … “
3. if chatGPT doenst know/dreams bullshit/ you cant figure it out, go to google and search for your problem: “‘,’ expected.ts(1005) javascript”, read articles from other people who might have had the same issues
4. if googleing didnt help either, post your question with code AND error to stackoverflow or a discord
You will have to learn the syntax of javascript and the basics yourselves.
We have covered: variables, objects, functions.
You should now go and learn yourself about:
for-loops, if statements, data types
Here again, usually chatGPT is very helpful with basics:
“Tell me about data types in javascript”
There are also A LOT of youtube tutorials and free-online-tutorials for learning the basics:
https://www.w3schools.com/js/
https://www.youtube.com/watch?v=2nZiB1JItbY
And if you think something is magic, for example how you give text to worldpainter and it does stuff, let ChatGPT explain it to you.
Just be aware the ChatGPT doesnt know THAT much about worldpainter and will lie to you. Use it mostly for basics about javascript.NOTHING IS MAGIC, EVERYTHING IS DEFINED AND CALLED SOMEWHERE
Final words
You have learned the very basics of
- how to create a script file
- how to execute it
- what tools to use for editing
- where to find help
- where to learn more
With this, i leave you to your own adventure, happy coding.
-
Where can I download old versions of WorldPainter?
This guide will tell you how to download previous versions of WorldPainter.
Details
This guide will tell you how to download previous versions of WorldPainter.
-
How do I use .js scripts in WorldPainter?
WorldPainter allows executing JavaScript files (.js) in its own scripting API. Warning: Once started, there is no way to interrupt a script without crashing worldpainter. Save your work before running a script.
Details
WorldPainter allows executing JavaScript files (
.js) in its own scripting API.- Download the script from GitHub or <#1095425730206257266>.
- In WorldPainter, top-center click
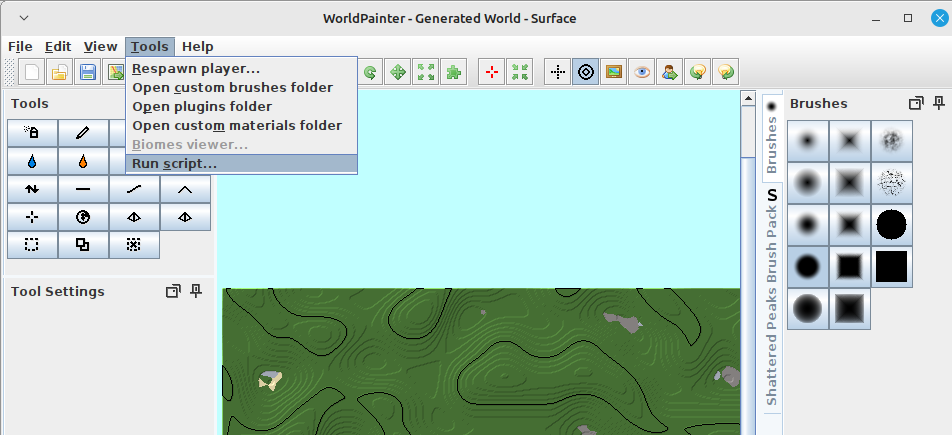
Tools -> Run Script. - Select the path to your downloaded script in the file tab.
- Set the parameters in the window for the script.
- Run the script.
- Close the window. Undo/Redo works for scripts too.
Warning: Once started, there is no way to interrupt a script without crashing worldpainter. Save your work before running a script.
-
How do I download things from GitHub?
3 easy ways to get what you want from github without being a sweaty programmer.
Details
Note: Github is primarily made for developers to share code with eachother. Distributing ready-to-use-programs to end users is an afterthought and is not intuitive for the public.Look for the release page on the right window; good chance there are
.exefiles or similar bundled downloads available.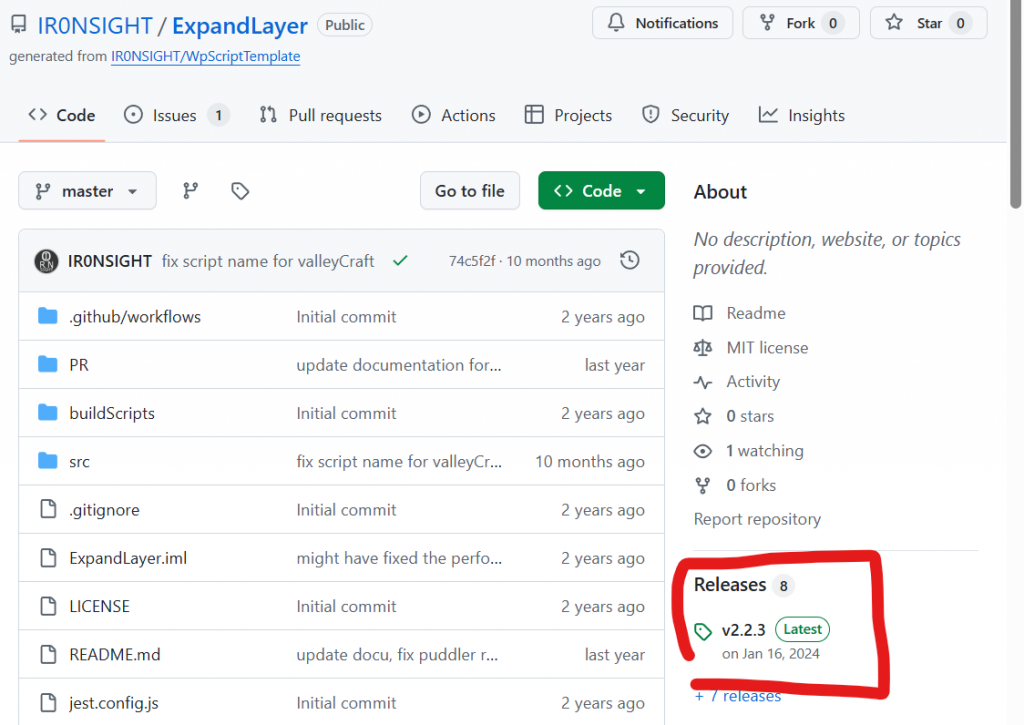
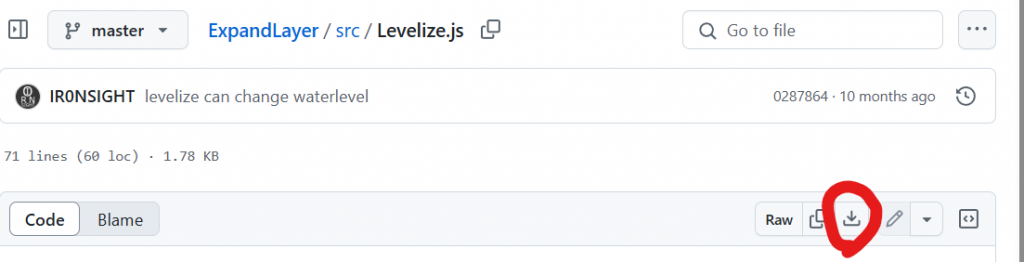
If no releases exist and you just want to get the files you see in the source overview, use the green “Code” button and download as zip. This will usually not work if you are downloading a program that needs to be executed.
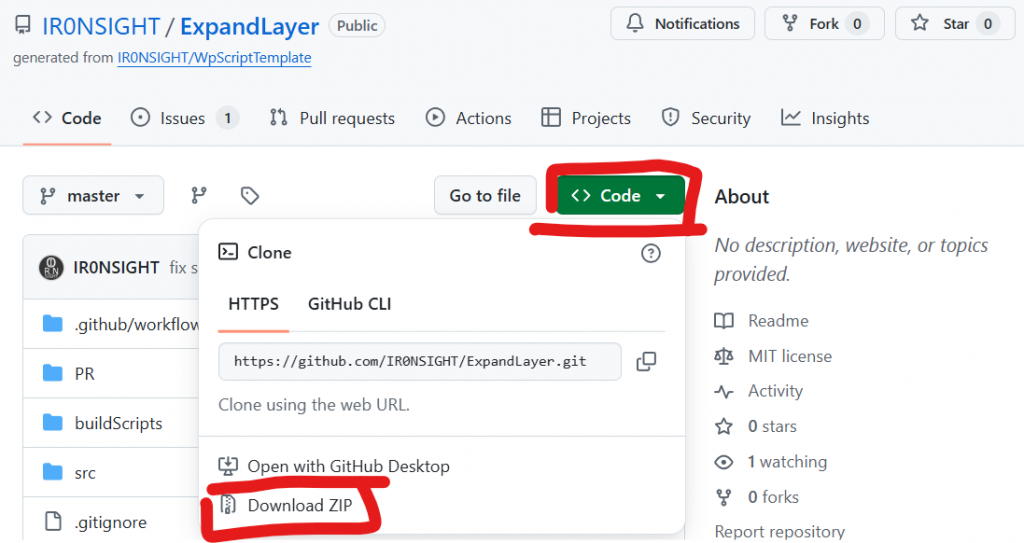
If you only want to download one single file, use the “download raw file” button. This also only works for programs that dont need to be compiled. If in doubt, contact the developer.